
How do I manage my API access and connected devices?
Updated Reading time: 5 min
On this page
In the Integrations tab of your profile, you download the desktop app, connect calendar and file apps to your account, link the Kibi app and your buddy, grant access to a buddy, and create personal API tokens for other programs. Here you can also see what is already connected and revoke individual accesses.
Info
You will only see the Integrations tab if your administration has enabled at least one connection: the REST API, WebDAV, CalDAV, or AI assistants (MCP). Which cards appear in it depends on what is enabled and what your role is allowed to do.
How to open the integrations#
Click on your profile picture (your initials) at the top right.
Select My profile.
Open the Integrations tab.
Download the desktop app#
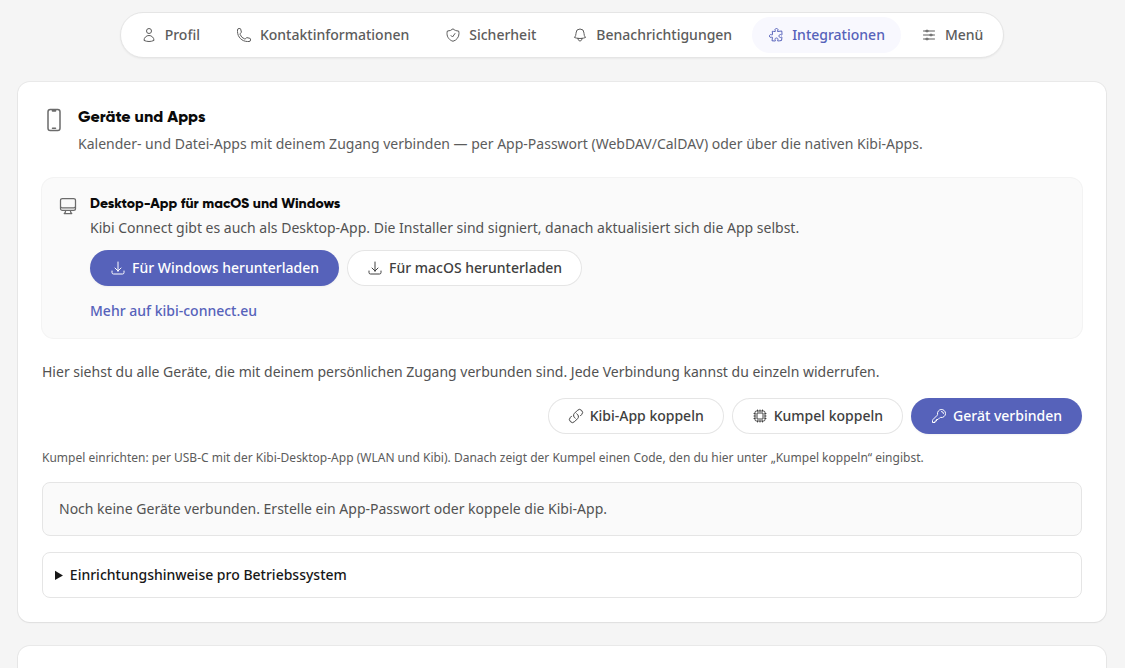
Kibi Connect is also available as a desktop app for macOS and Windows. You can find the download at the top of the card Devices and Apps in the box Desktop app for macOS and Windows.
Click on Download for Windows or Download for macOS. The button for the operating system you are currently using is at the front and is highlighted.

Open the downloaded file and install the app.
Connect the app to your account as described under Pair Kibi app.
The installers are signed. After that, the app updates itself. You can find more about the desktop app via More on kibi-connect.eu.
Info
In the desktop app and in the mobile Kibi app itself, the card does not show this box. You only see it in the browser.
Connect calendar or file app (app password)#
With an app password, you display the platform's calendars in the calendar app on your smartphone or computer (CalDAV) or mount the platform's files as a drive (WebDAV). Create a separate app password for each device. Then you can revoke them individually.
In the Devices and apps card, click Connect device.
Under Device name, enter a name that will help you recognize the device later, for example "iPhone Calendar".
Under Access to, select what the device may use: Files (WebDAV), Calendar (CalDAV), or both.
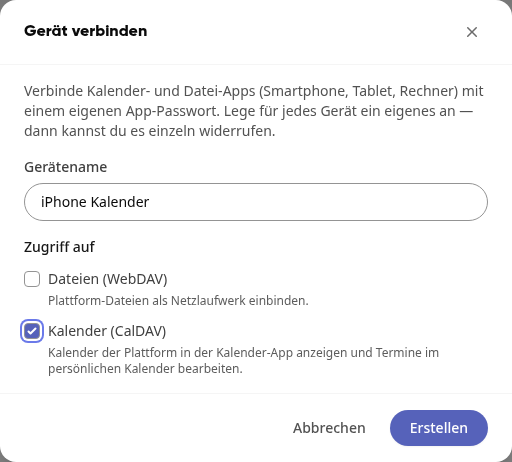
Click Create.
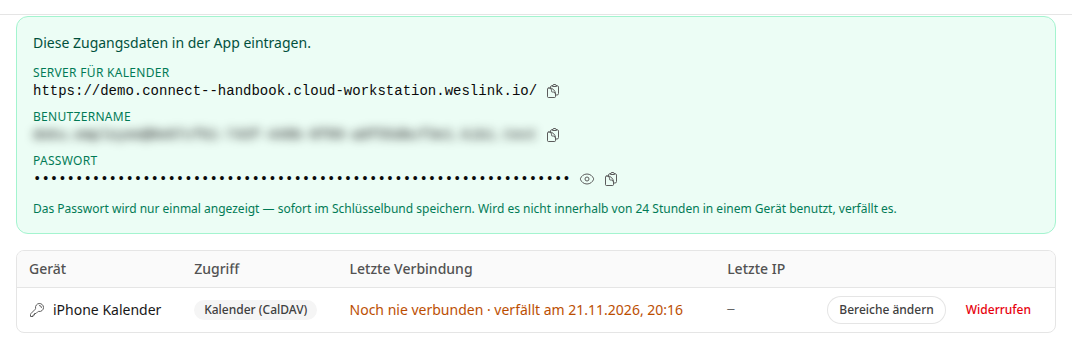
The platform shows you the access data: Server, Username, and Password. Copy them using the icon next to the value and enter them in the app on your device.
Warning
The password is only displayed once. Save it immediately in the app or in the keychain. If you do not use it on a device within 24 hours, it expires.
Under Setup instructions per operating system, you will find where to enter the access data on iPhone and iPad, in macOS Finder, in Windows Explorer, and on Android.
Pair the Kibi app#
Using a pairing code, you connect the desktop app or the mobile Kibi app to your account.
In the Devices and apps card, click on Pair Kibi app.
The platform displays a pairing code and how long it is valid.
Enter the code in the desktop app or the mobile app.
If the code has expired, click on Generate new code.
Release buddy#
If your administration assigns a buddy to you, you will receive the notification Release buddy?. In the Devices and apps card, the yellow card Release buddy will then appear at the top. Only after you release it will the buddy work with your account.
Look at the buddy's display and enter the number under Number on the buddy.
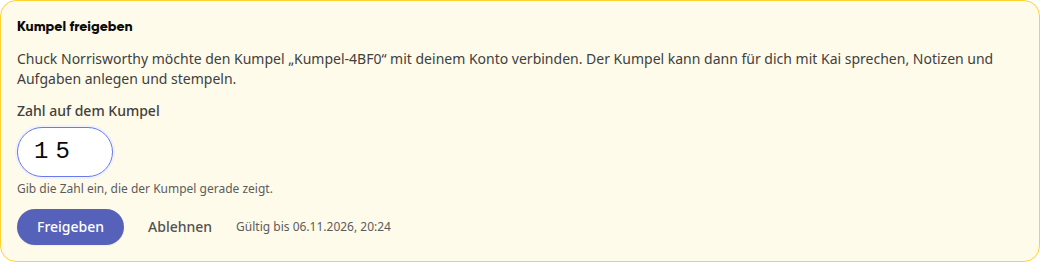
Click on Release.
If the number does not match, the card shows The number does not match. Look at the buddy's display. If you are not expecting a buddy, click on Reject.
More on this, including how to operate the buddy: Release and use buddy.
Pairing a buddy#
With Pairing a buddy, you connect a buddy yourself to your account. It then works with AI, notes, chat, tasks, and time tracking. You can remove it at any time in the device list.
Info
New buddy without Wi-Fi? Connect it via USB-C to a computer with the Kibi desktop app and set up Wi-Fi and Kibi there. After that, it will show a code. Setup via Bluetooth is no longer available.
In the Devices and apps card, click on Pair buddy.
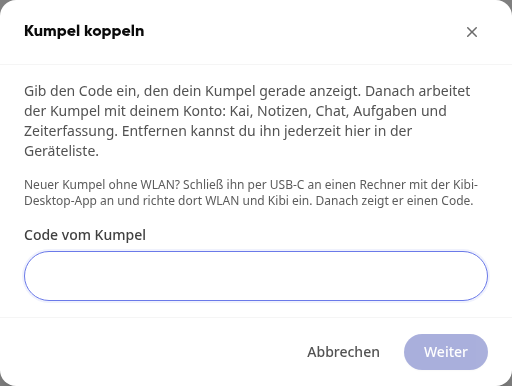
Under Code from buddy, enter the code your buddy is currently showing, and click on Next.
Check whether this is your buddy. The platform shows you Device, Code requested by, and Code requested at, along with Device name if the buddy has a name.
Click on Pair and then on Done.
Warning
Only pair a buddy that is right in front of you and showing this code. If someone sent you the code or link, do not pair. Whoever has the buddy will use it to read your notes, tasks, and messages.
With the buddy's QR code#
The QR code takes you to the Integrations tab and opens Pair buddy with the code. If you are not logged in yet, log in first. No matter how you log in, even with SSO or a login link via email: After that, Pair buddy opens. The buddy is only paired once you click on Pair yourself.
If pairing does not work#
If you cannot pair right now, after the QR code you will see the note Pairing a buddy is currently not possible here in the Devices and apps card, along with the reason and the next step.

Pairing or REST API disabled: Contact your administration. For this, the REST API and Allow Kibi buddy pairing must be enabled there.
Service account: Log in with your personal account and open the link from the buddy again.
The code is valid for 10 minutes. If it has expired, the buddy will show a new one after a restart.
Info
If nothing is enabled for you, the Integrations tab does not exist. The QR code will then only open your profile, without any note. In that case, contact your administration as well.
Buddy that ran via your phone#
The connection via the phone (Bluetooth) is no longer available. If your buddy last ran that way, the note Please connect buddy via Wi-Fi appears in the Devices and apps card. With the latest buddy software, it works via Wi-Fi again. If Wi-Fi is not set up yet, connect it via USB-C to a computer with the Kibi desktop app and set it up there.

Check and revoke connected devices#
The list in the Devices and apps card shows each connected device with Access, Last connection, and Last IP.
Change areas: Set whether the device may access files, calendar, or both.
Revoke: Confirm the prompt with Revoke. The device immediately loses access.
Remove (for buddy): Confirm in the Remove buddy dialog with Remove. The buddy is reset, and unsent voice notes are lost.
Create a personal API token#
With an API token, other programs access the platform via the REST API with your permissions, for example, an evaluation tool or an automation.
In the API card, click on Create new token.
Under Name, enter a name by which you can recognize the token, for example, "Task evaluation".
Under Permissions, select only the areas the program really needs, for example, tasks:read to read tasks. With All, you select all permissions at once.
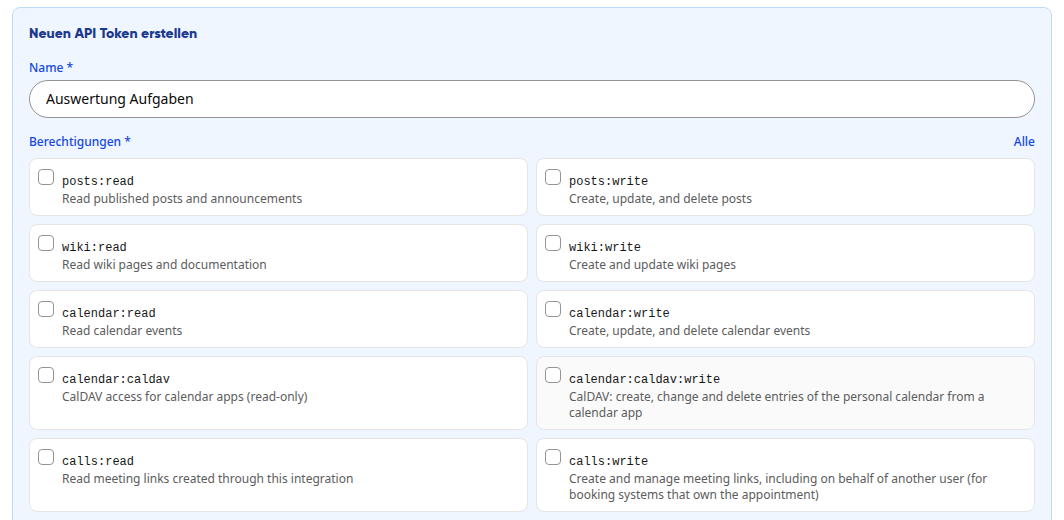
If needed, set an expiration date under Expires on (optional).
Click on Create token.
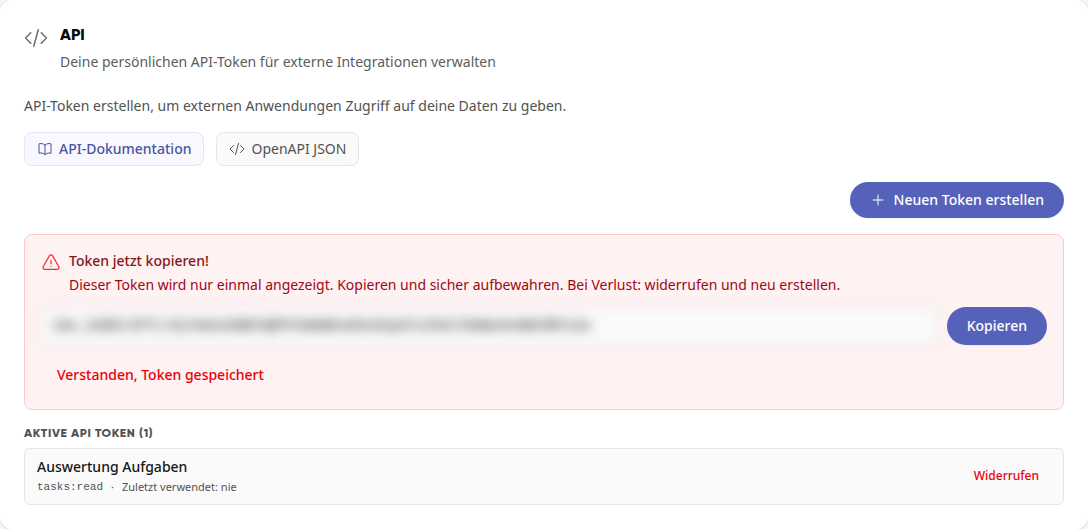
Click on Copy and store the token securely, for example, in a password manager. Then click on Understood, token saved.
Warning
The token is only displayed once. If it is lost, revoke it and create a new one.
Under Active API Tokens, you can see each token with its permissions and when it was last used. Via API documentation and OpenAPI JSON, you will find the description of the interface for development.
Revoke token#
Click on Revoke for the token.
Confirm with Revoke. Programs using this token will immediately lose access.
Info
Your administration can specify that only certain roles are allowed to create API tokens. If the API card is missing, contact the administration.