
How do I set security and permissions?
Updated Reading time: 4 min
On this page
On the Security page in the administration, you define how your employees log in, how the Kibi app is protected on the phone, who can be invited as a guest, whether folders and files can be shared with individual people, and whether the platform stores the location where photos were taken.
Info
These settings are available to system administrators.
Open the "Security" page#
Open the administration and select the Security entry under System in the menu.
The page consists of several cards. Set what you want to change in the cards. You can also change several cards one after the other.
Click on Save at the top right of the page header. This one button saves all cards together. After that, Saved will appear there until you change something again.
Set two-factor requirement#
In the Two-factor requirement card, there are three options to choose from:
Optional: Each person decides for themselves in their profile under "Security".
Required for all: Everyone must set up two-factor authentication with an authenticator app.
Required for specific roles: Only people with one of the selected roles must set it up.
Under Two-factor requirement, select the appropriate option.
If you have selected Required for specific roles, check the roles under Affected roles. If no role is checked, no one will be forced.
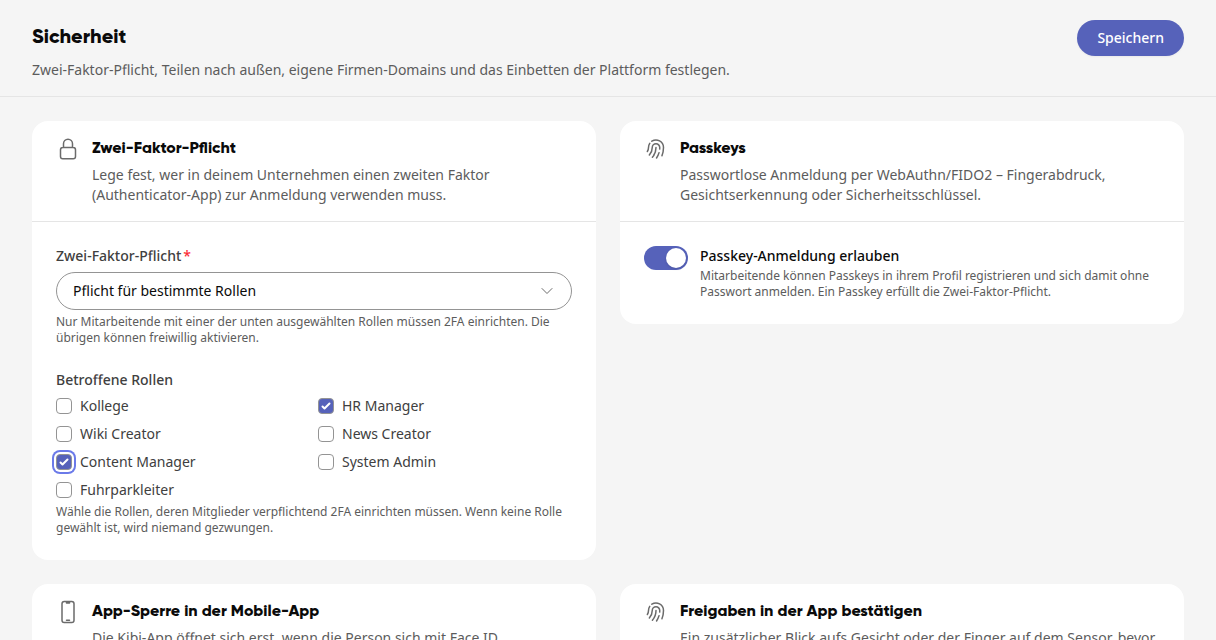
In the Passkeys card, you can enable or disable passwordless login via fingerprint, facial recognition, or security key with Allow passkey login. A passkey also fulfills the two-factor requirement.
Click Save at the top right.
Warning
If you make two-factor authentication mandatory for a role that you yourself have, you must also set it up. Keep your phone with the authenticator app ready.
Enforce app lock in the mobile app#
In the card App lock in the mobile app, turn on the switch Enforce app lock in the mobile app. The Kibi app will then only open after the person has confirmed with Face ID, fingerprint, or the device passcode.
Under Lock again after, select how long the app may remain in the background before it asks again.
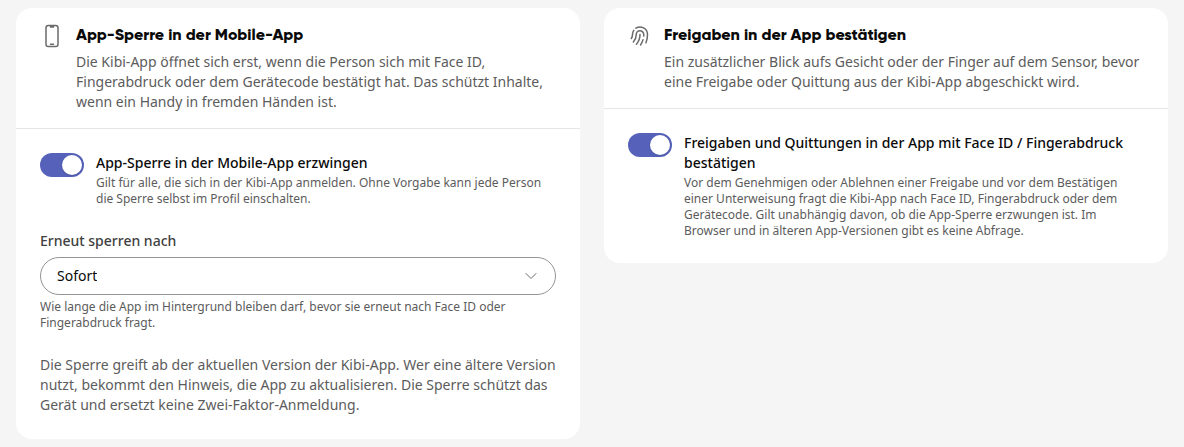
With Confirm approvals and receipts in the app with Face ID / fingerprint, the app additionally asks for Face ID or fingerprint before approving or rejecting an approval and before confirming an instruction.
Click Save at the top right.
Info
Without a specification, each person can enable the app lock themselves in their profile. The lock protects the device and does not replace two-factor authentication. Anyone using an older version of the Kibi app will be prompted to update the app.
Company Domains and iFrame Embedding#
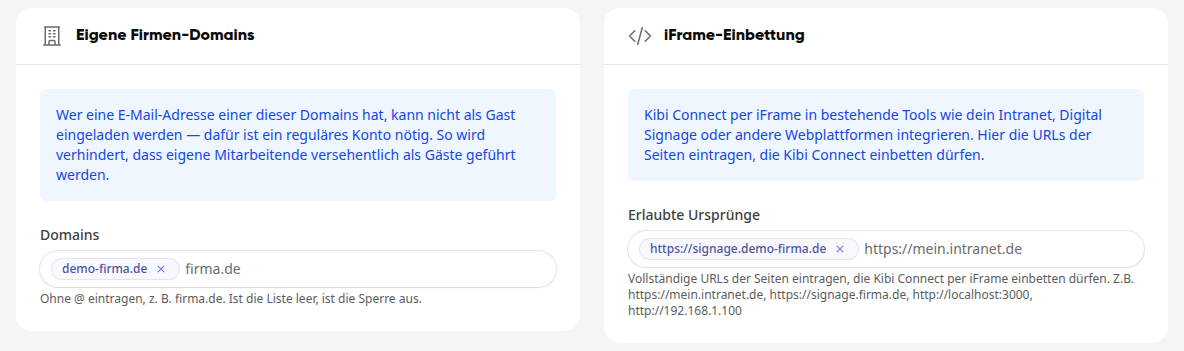
In the Own company domains card under Domains, enter your company's email domains without the @, for example company.de. Confirm each domain with the Enter key. Anyone with an address using one of these domains cannot be invited as a guest. This ensures that your own employees do not accidentally end up on the platform as guests.
In the iFrame embedding card under Allowed origins, enter the full addresses of the pages that may display Kibi Connect in an iFrame, for example a digital signage display.
Click Save in the top right corner.
Sharing with People, Magic Links, and Change Log#
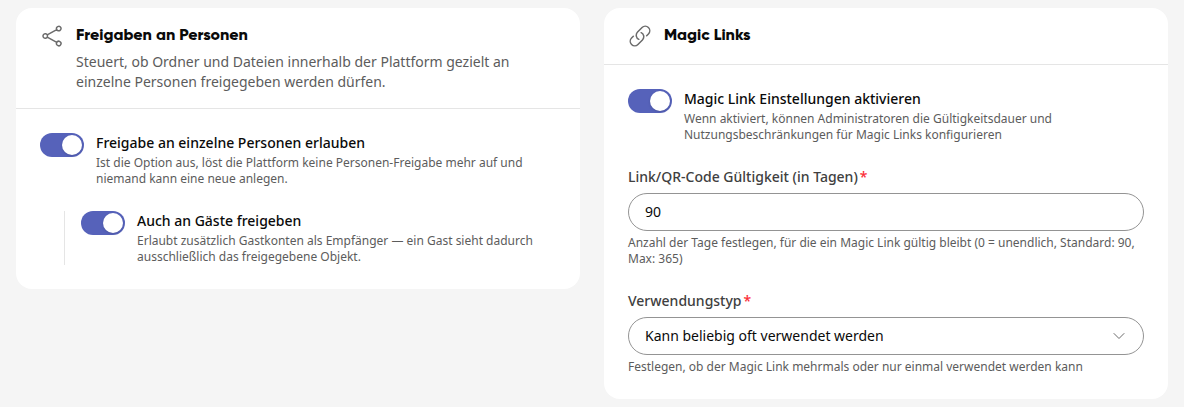
In the Sharing with People card, you use Allow sharing with individual people to control whether folders and files may be shared specifically with individual people. With Also share with guests, guest accounts may also be recipients; a guest then only sees the shared object.
In the Magic Links card, you enable Activate Magic Link settings to specify how many days a login link or QR code is valid (Link/QR code validity (in days), 0 = unlimited, maximum 365) and whether it can be used any number of times or only once (Usage type).
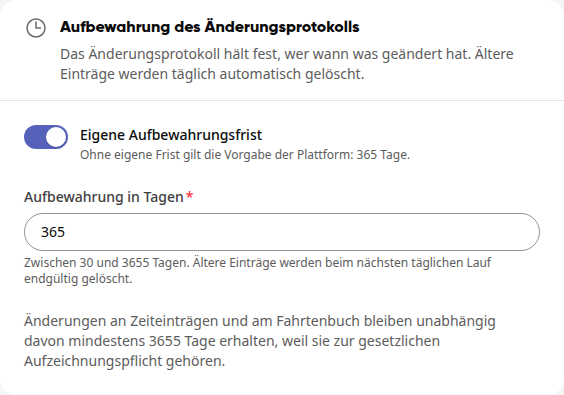
In the Change log retention card, you use Custom retention period to specify how long the log records who changed what and when. Under Retention in days, 30 to 3655 days are possible. Without a custom period, the platform default of 365 days applies.
Click Save in the top right corner.
Info
If you disable sharing with individual people, existing people shares no longer take effect and no one can create new ones. Existing shares with guests, however, remain effective if you only disable Also share with guests. Changes to time entries and the logbook remain available for at least 3655 days regardless of the period, because they are subject to statutory record-keeping obligations.
Photo Location#
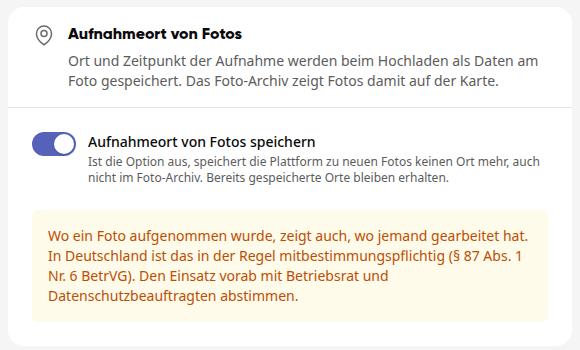
When someone uploads a photo, the platform stores the location and time of capture as data on the photo, for example in posts, in chat, in the file manager, or for damage photos in the fleet. The photo archive then displays photos on the map. This setting is enabled from the start.
Find the Photo Location card.
Turn off Save photo location if the platform should no longer store the location for new photos, including in the photo archive.
Click Save in the top right corner.
Locations that have already been saved remain intact when you turn off the switch.
Warning
Where a photo was taken also shows where someone has worked. In Germany, this is generally subject to co-determination rights (Section 87 (1) No. 6 BetrVG). Coordinate the use in advance with the works council and data protection officer.