
How do I set up a workflow?
Updated Reading time: 17 min
On this page
- How to open the workflows
- Start a workflow from the "Templates" tab
- Create Workflow
- Starting with a template
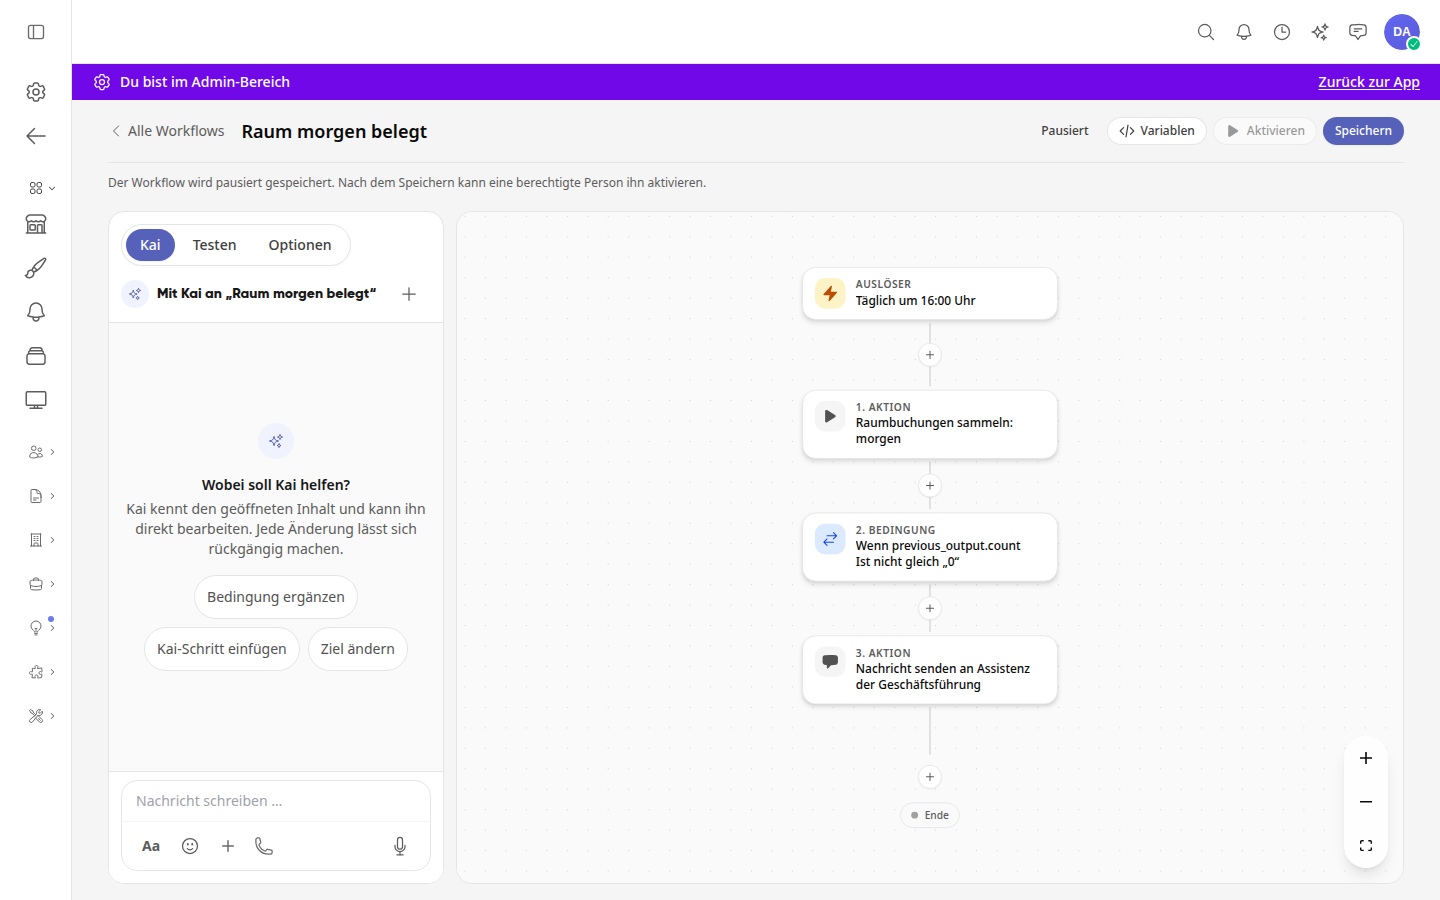
- Set up the "Room occupied tomorrow" template
- Conditions on fields with fixed values
- The Trigger Types
- Welcoming new colleagues and returning employees
- The trigger "Leave requested"
- The Actions
- Recipient "Myself"
- Create appointment
- Save project report
- Create task
- Have the post approved first
- The Kai Step
- Content created by Kai is labeled
- Estimated Cost of an Agent
- Creating a workflow from the agent
- Creating a workflow from the Kai chat
- Testing the workflow
- Activating and pausing workflows
- Changing a running workflow
- Resuming an interrupted run
- Options
- Module Automations
With workflows, you automate processes consisting of triggers, conditions, and actions: for example, a reminder every Monday or an approval as soon as someone submits a request.
Info
System admins set up workflows for the entire company. Whether employees are allowed to build their own workflows is determined by you per role: under Administration → Roles & Permissions with the permission Own workflows at the level Create or Administer. Employees with this permission work in the same workflow editor and only see their own workflows there. There is no longer a separate switch for this in the AI settings.
How to open the workflows#
Open the Administration.
In the menu, select AI & Workflows → Workflows.
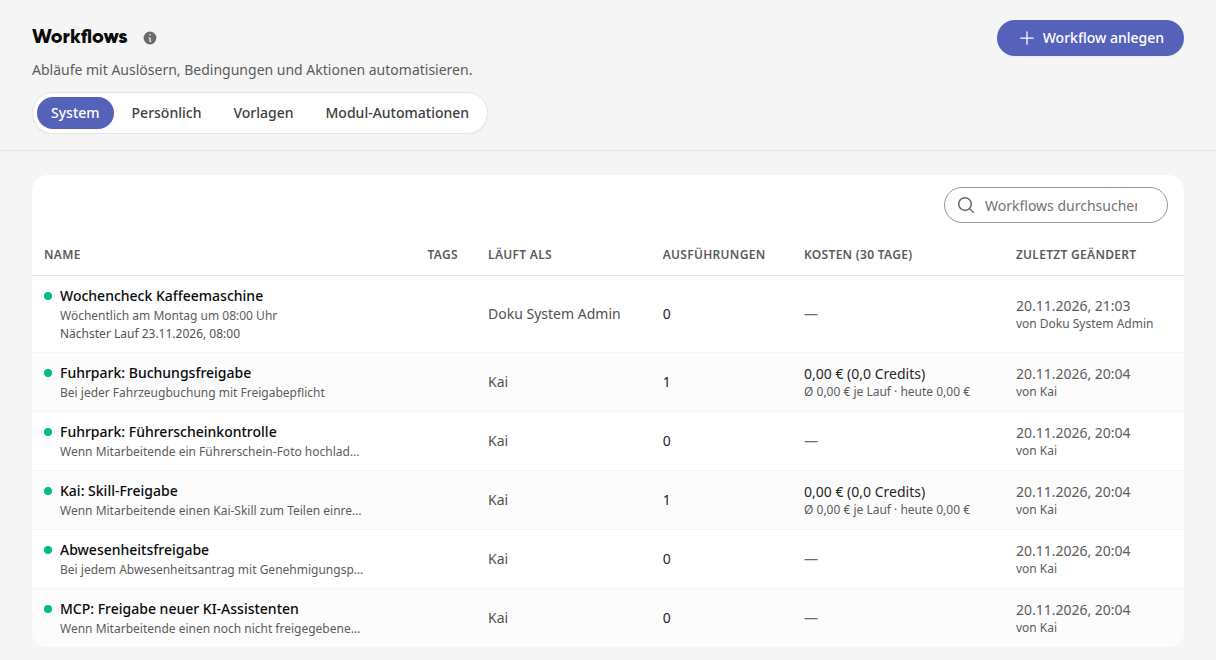
The page has four tabs:
System: the workflows for the entire company. This also includes the workflows that come with the platform itself, for example Absence approval or Fleet: Booking approval.
Personal: the workflows that employees have created for themselves. The Owner column names the person whose permissions the workflow runs with. Using the toggle in the Active column, you can pause a personal workflow directly in the list or switch it back on. If there are none yet, No personal workflows yet is displayed there.
Templates: ready-made templates from which you start a new workflow (see below).
Module automations: the scheduled processes of your own modules (see below).
Below the name, you can see what triggers the workflow. For an active workflow with a schedule, Next run with date and time is also displayed below it. If the time zone of the schedule differs from your company's time zone, it is shown after it, for example "· Europe/London". Paused workflows and workflows that only start manually do not show a next run. The Costs (30 days) column shows what the runs of the last 30 days have cost, in euros and Kai Credits, below that the average per run and today's share, for example "Ø €0.00 per run · today €0.00". If there are no runs, a dash is displayed there.
A green dot before the name indicates an active workflow; for a paused one, Paused is displayed next to the name. Using Search workflows, you can find a workflow by its name.
Start a workflow from the "Templates" tab#
In the Templates tab, you see all workflow templates as cards: the built-in ones and those that Weslink maintains for all companies.
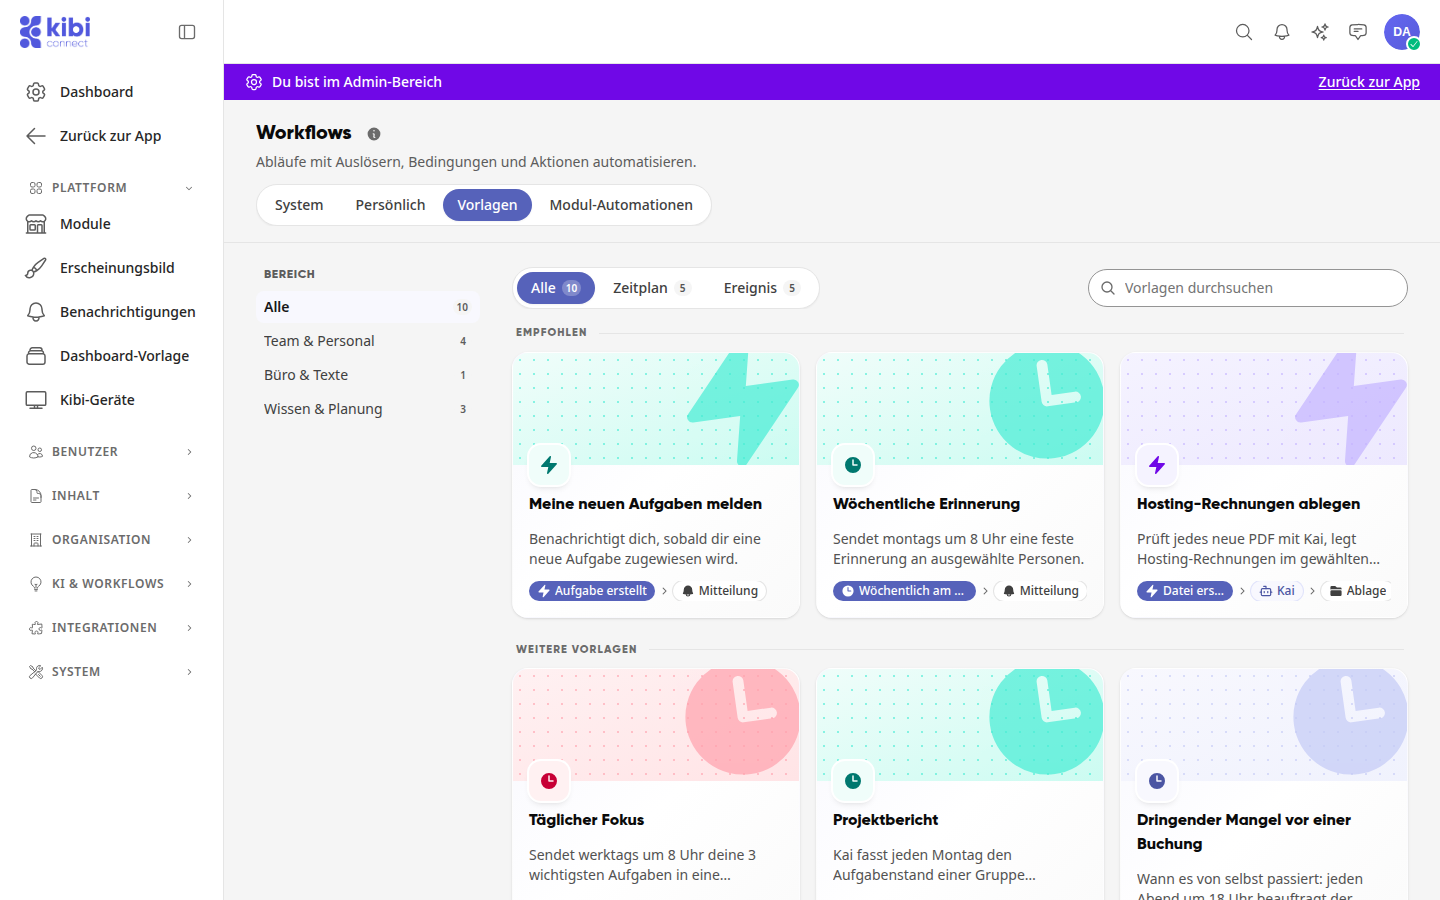
Switch to the Templates tab.
Choose a template:
Use the Area bar on the left to narrow down to an area, for example Team & Personnel or Knowledge & Planning.
With All, Schedule and Event, you select whether the template starts at fixed times or on an event.
Use Search templates to find a template by its name.
At the top, under Recommended, you see the templates for getting started, and below under More templates, all the others. Each card shows at the bottom what it starts with and which steps follow.
Click on a card. Under How it works, you see when the template starts and which steps it has. A note tells you what is still open after adopting it, such as the recipients.
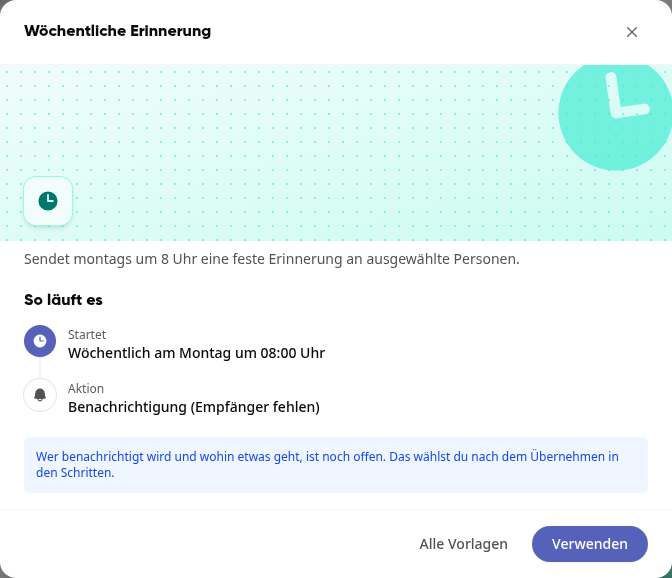
Click on Use. The workflow editor opens with the name, trigger and steps of the template.
Add what is still missing, for example the recipients of a notification, and click on Save.
Info
Until you click on Save, nothing is created. If you leave the editor beforehand, nothing remains from the template.
Create Workflow#
Click on Create Workflow at the top right. On mobile, this is the round button with the plus sign.
Enter the name at the top, or start with a template under Start with a template, for example Weekly Reminder. Clicking on the template shows under How it works how it starts and which steps it has. Use Use to adopt it. Via All next to it, you see the entire selection with search; the filters Schedule, Event, and New Entry narrow it down. The template includes the name, trigger, and steps. You check the goals of the steps yourself afterwards.
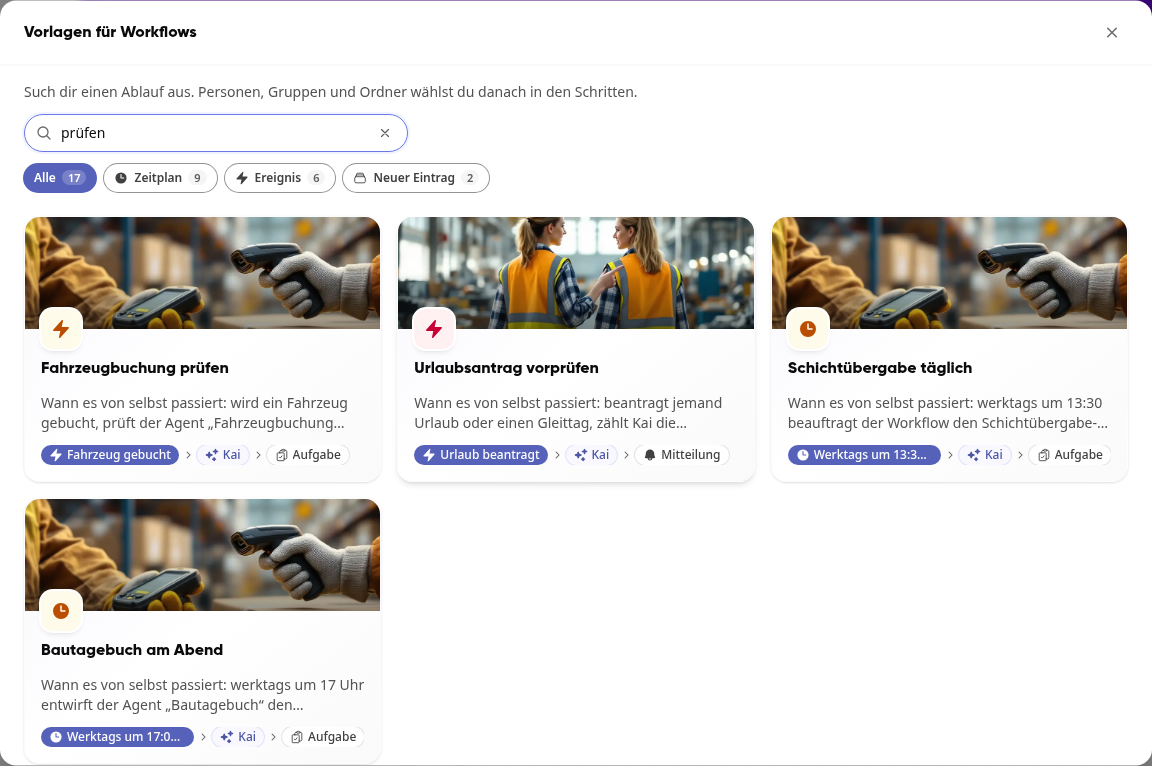
Click on the Trigger box and select the Trigger Type: Manual, On Schedule, or When Something Happens.
Click on the + in the line to insert a step: Action, Condition, Approval, Involve Works Council, or Kai Step. A Kai step consumes company credit.
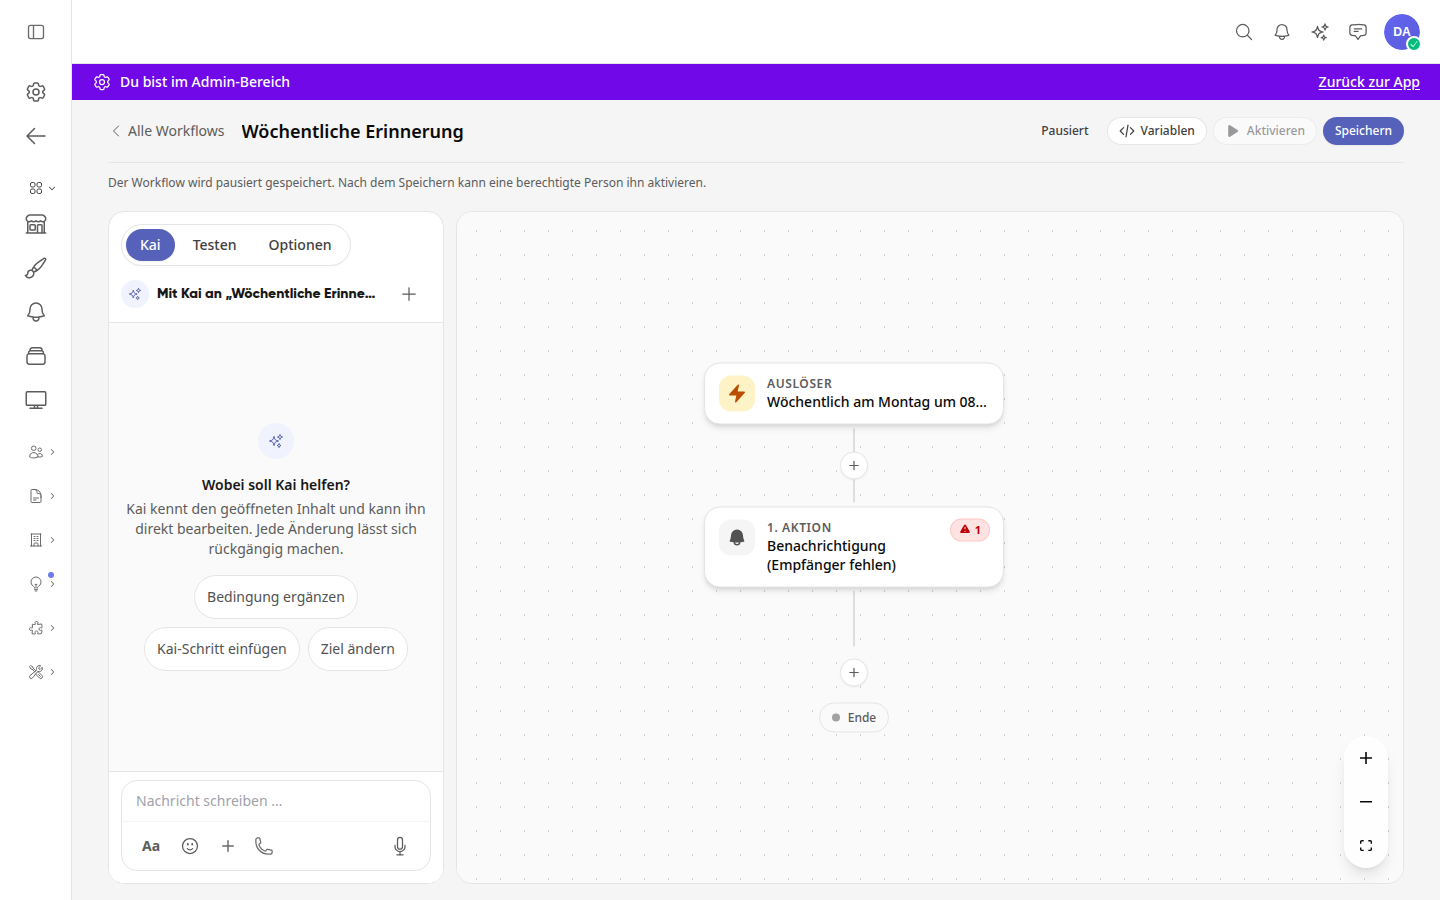
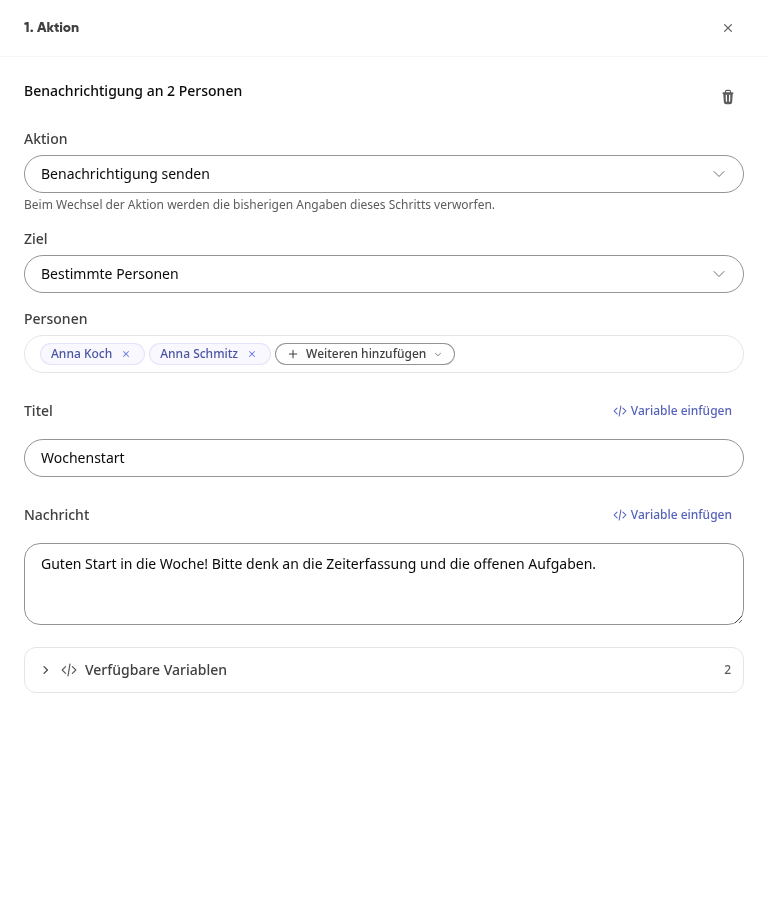
Click on a step to configure it. For an Action, for example, you select Send Notification, the Target, a Title, and the Message. Insert Variable takes values from the process into the text.
Click on Save.
The workflow is saved paused. It only runs once you activate it. Via All Workflows at the top left, you return to the list. The History tab is available as soon as the workflow is saved.
Starting with a template#
Under Starting with a template, in addition to the built-in templates, you will also find the templates that Weslink maintains for all companies, for example Daily shift handover, Inspection deadlines due, or Content weekly plan. These also include the following:
Check vehicle booking: When a vehicle is booked, Kai checks UVV, MOT, and maintenance for the booking period. Only if something expires, the mileage reaches the maintenance point, or nothing is stored, a task is created for the fleet department. You choose who receives it in the Create task step.
Pre-check vacation request: When someone requests vacation or a flex day, Kai counts the absences in the person's groups during the requested period and compares them with the minimum staffing. You enter the minimum staffing per group in the Kai step instead of the placeholder in square brackets. Whoever is allowed to approve the request receives a notification. Kai does not evaluate or decide.
Weekly review only for me: On Fridays at 2 p.m., Kai summarizes what you have completed during the week and what is still open. Only you receive the review as a chat message.
Project report: Every Monday at 8 a.m., Kai summarizes the task status of a group. The report is saved as a Word file in the group's folder, the workflow reports it in the group chat, and sends the summary by email. You select the group in the Options tab under Group, chat, and email recipients in the steps (see Save project report below).
Room occupied tomorrow: Every day at 4 p.m., the workflow announces in the chat what is booked in a room for tomorrow. If nothing is booked, the chat remains quiet. The template works without Kai and does not consume any Kai credits (see setup below).
Warning
For Pre-check vacation request, a works agreement is required before activation (§ 87 (1) No. 6 BetrVG, and also No. 5 for fixed minimum staffing).
Via All, you open the entire selection. At the top is the Recommended row.
Each card shows the steps of the template under How it works, for example Kai, check, and task.
People, groups, and folders are still open in the template. You select them in the steps after adopting it. You replace placeholders in square brackets such as [Shift group] in the text.
If the template belongs to an agent template, you select the agent yourself in the Assign agent step. If you create the workflow from an adopted agent, it is already assigned.
Some templates only create a task when Kai writes a signal word such as DUE, URGENT, or CHECK. A condition with Contains the word checks this, pays attention to uppercase and lowercase letters, and only matches the whole word.
If there is no suitable template, you describe to Kai via Kai builds it for you what the workflow should do.
Set up the "Room occupied tomorrow" template#
With this template, reception, building services, or assistants, for example, find out the day before what is scheduled in a room. It requires the Room Booking module.
In the Templates tab, search for "Room" and click on the Room occupied tomorrow card. Under How it works, you will see the steps: Daily at 4:00 PM, Collect room bookings: tomorrow, a check to see if bookings were found, and Send message (target missing).
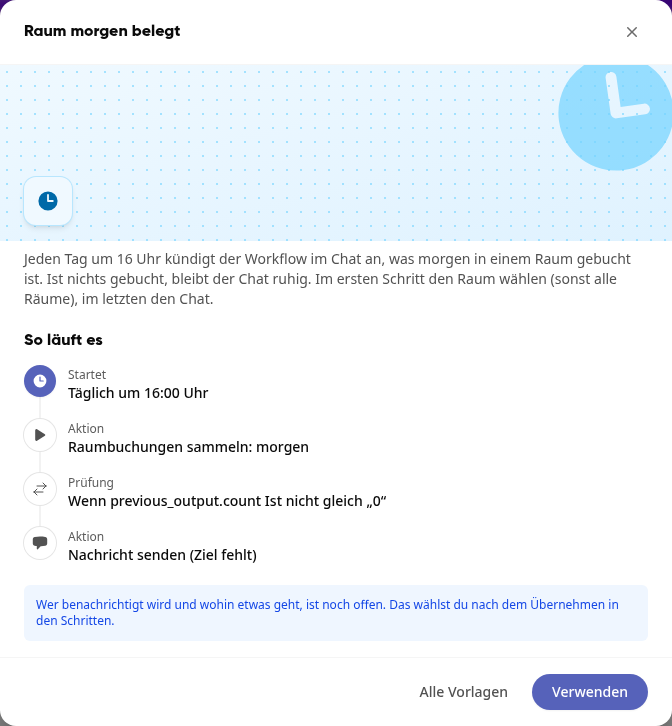
Click on Use.
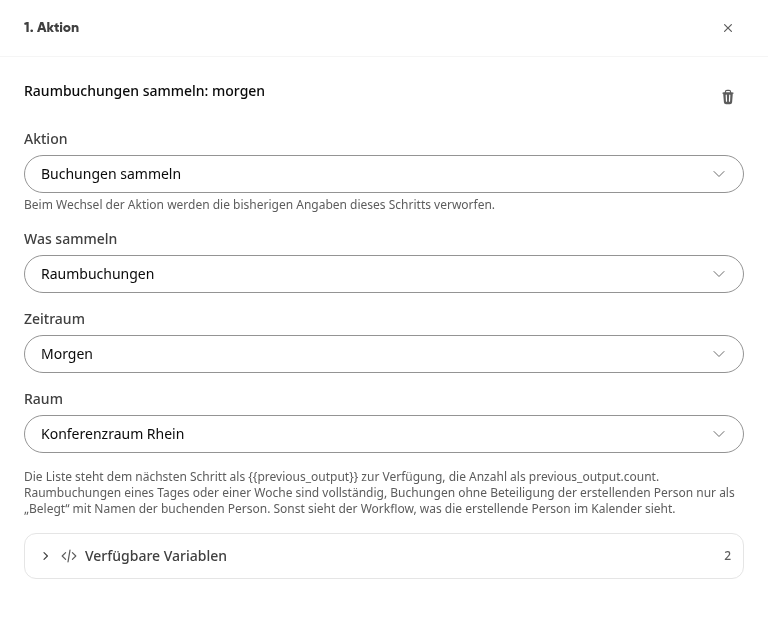
In the editor, click on the step Collect room bookings: tomorrow and select the room under Room, for example Conference Room Rhine. If you leave All rooms selected, the workflow will collect bookings from all rooms.
Click on the step Send message (target missing) and select the chat under Conversation where the announcement should appear. The message begins with "The room is occupied tomorrow:", followed by the list of bookings.
Click on Save. The workflow is saved but still paused. Use Activate to turn it on.
Info
The workflow sees all bookings for the room. Bookings in which the person who set up the workflow is not involved appear only as "Occupied" with the name of the booking person, without a title. If a booking is moved or canceled after being created, it simply will not appear in the list the day before.
Conditions on fields with fixed values#
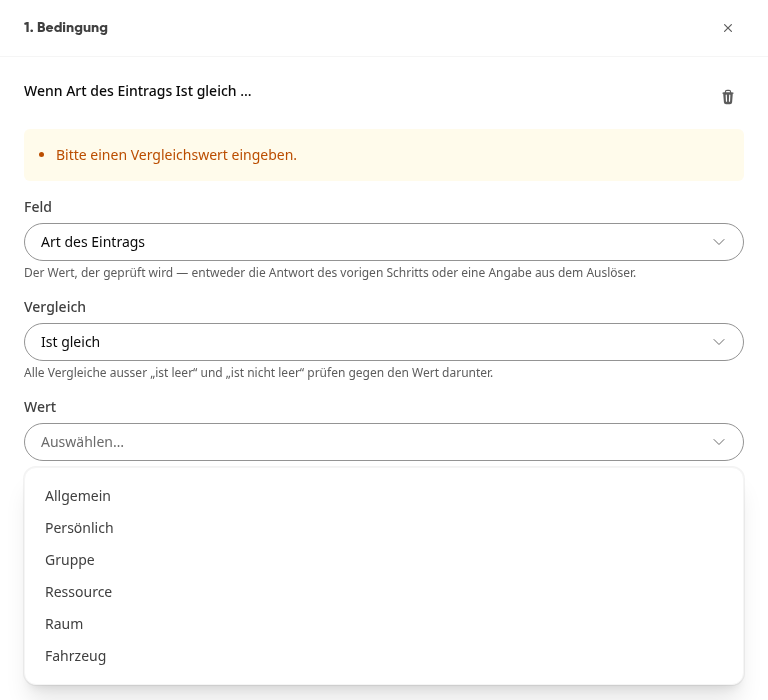
Some fields of a trigger only have fixed values, for example Type of entry for Room booked (General, Personal, Group, Resource, Room, Vehicle) or the status of a vehicle booking. For Is equal to and Is not equal to, you select the value from a list.
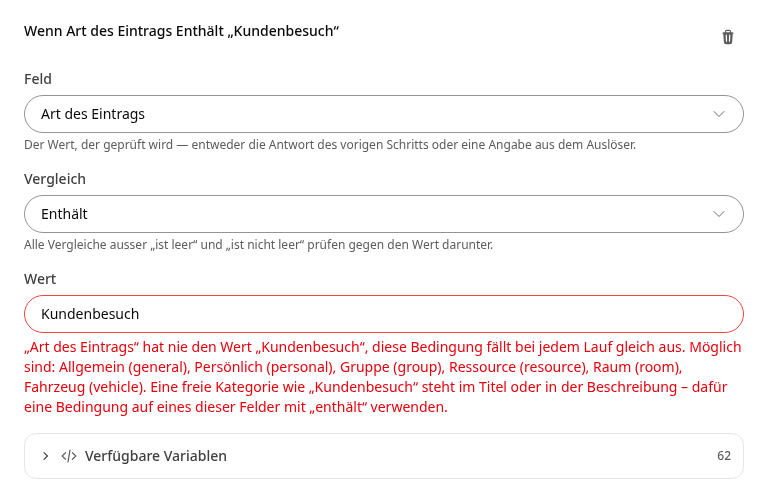
If you enter a value that the field never takes, the workflow cannot be saved. The step then says, for example: "„Type of entry" never has the value "Customer visit", this condition always turns out the same on every run.", lists the possible values and points out that a free category is in the title or description.
Tip
Your own category such as "Customer visit" is in the title or description of the entry. Check it with a condition on Title or Description and the comparison Contains.
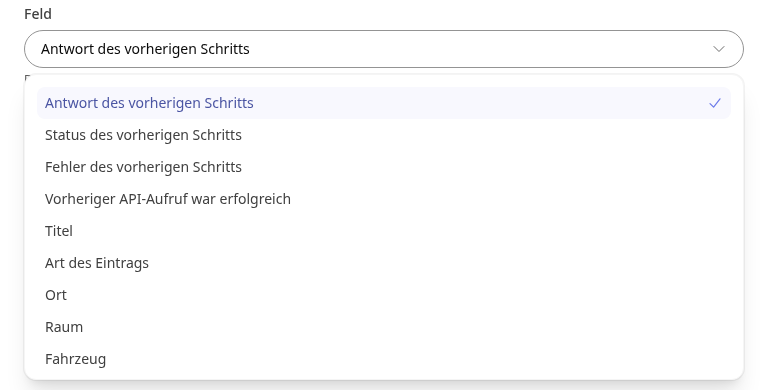
For room bookings and calendar appointments, the field is called Title, just like in the booking form. For people and files, it is still called Name. Existing conditions continue to run unchanged; they only show the new label.
The Trigger Types#
Manual: The workflow only starts when it is started manually.
Scheduled: The workflow starts at fixed times, even if no one is logged in. You set the frequency, time, and day of the week.
When something happens: The workflow starts as soon as something specific happens on the platform. Under Event, you select what that should be, for example Room booked, Leave requested, First login of a person, or First working day after an absence.
Welcoming new colleagues and returning employees#
Two events help with onboarding:
First login of a person: The workflow starts when someone logs in for the first time. Subsequent logins no longer trigger it. This way, you can, for example, welcome new colleagues. In conditions, it is called Logged-in person.
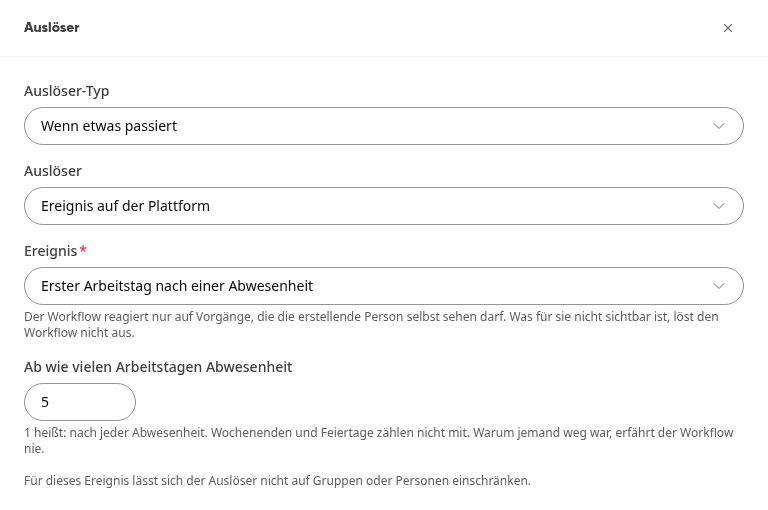
First working day after an absence: The workflow starts on the first working day on which someone is back after an absence. Under From how many working days of absence, you define how long the absence must have lasted at minimum (default 5, maximum 60). 1 means: after every absence. Weekends and holidays do not count. In conditions, it is called Returning person.
Info
The workflow never learns why someone was away. Both triggers cannot be restricted to groups or individuals.
The trigger "Leave requested"#
With the event Leave requested, a workflow starts as soon as someone requests leave or a flex day and the request is pending approval. This way, you can, for example, inform the manager or coordinate a substitute.
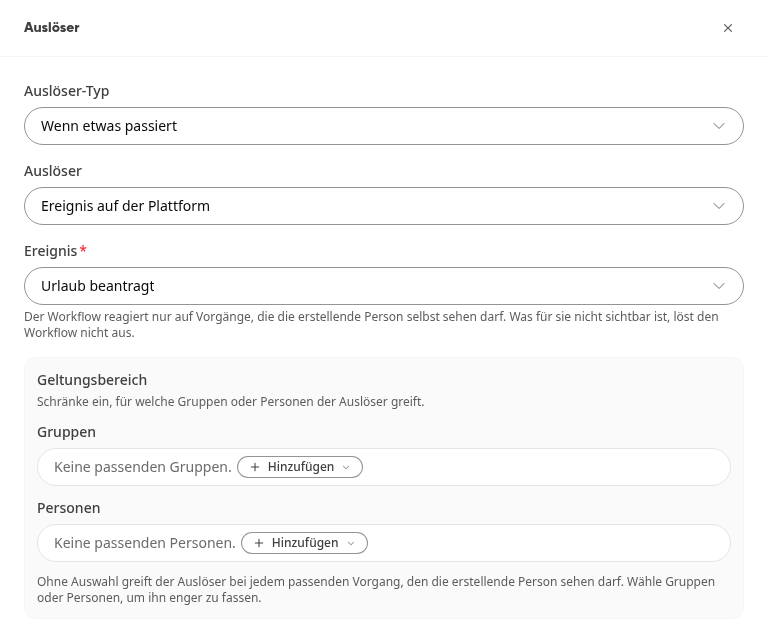
Under Scope, you restrict the trigger to groups or people. Without a selection, it applies to every matching request that the creating person is allowed to see.
Other absences do not start the workflow, such as special leave, training, or absences that do not require approval.
For Send notification and Send email, the target Who can approve the request (leave request) is available under Responsible person (automatic). These are the same people who also receive the approval request for the application.
A Kai step only mentions open requests from colleagues if every step of the workflow remains with these people: conditions, waiting times, Kai steps without their own approvers, and notifications or emails to Who can approve the request. If a step goes to someone else, such as the manager, into a chat, or as a task, Kai omits open requests entirely, including as a number.
Kai only prepares a hint, for example about overlaps in the team. It does not decide, approve, or reject. That remains with the people who approve the request.
Important
Sick notes never trigger this workflow. A Kai step also does not mention the absence type in workflows. If team visibility is restricted, it only mentions the number of absent people per day instead of names.
Warning
A workflow that evaluates leave requests is generally subject to co-determination in Germany (§ 87 para. 1 no. 6 BetrVG). Coordinate it with the works council before activating it, for example in a works agreement.
The Actions#
Warning
With Send notification, the target Roles cannot currently be saved: "A step is incomplete" appears. Instead, choose Specific people.
The following actions are also available: Post to feed, Send email, Send chat message, Create task, Create appointment, Call API, Collect bookings, Move file, Copy file, Create folder, and Store project report. With custom modules, Create module entry, Change module entry, and Start module release are also included.
Recipient "Myself"#
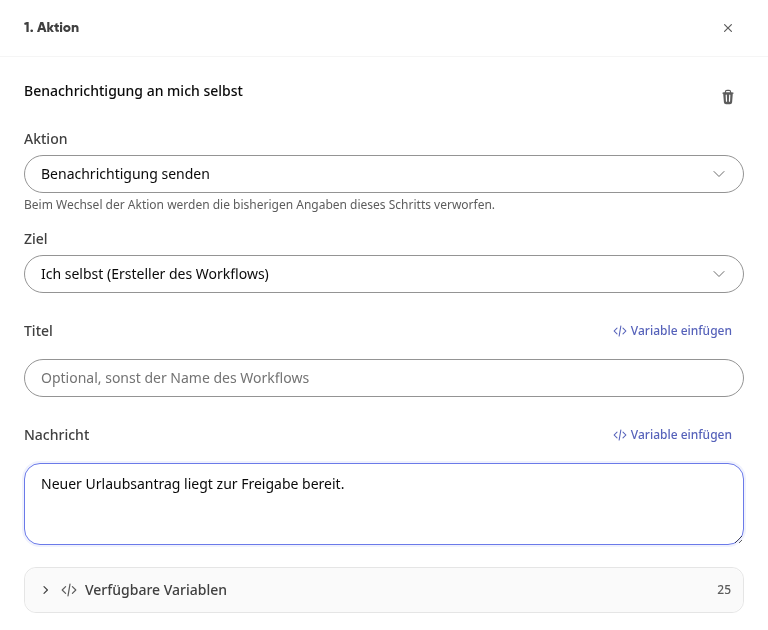
For Send notification, Send chat message, and Send email, you select the entry Myself (workflow creator) under Target. For Create task, you will find it under Assignment. The result then goes only to the person who created the workflow, regardless of what triggers it.
Info
If the person is blocked or deleted, the step fails and reports this in the history. The message never goes to anyone else.
Create appointment#
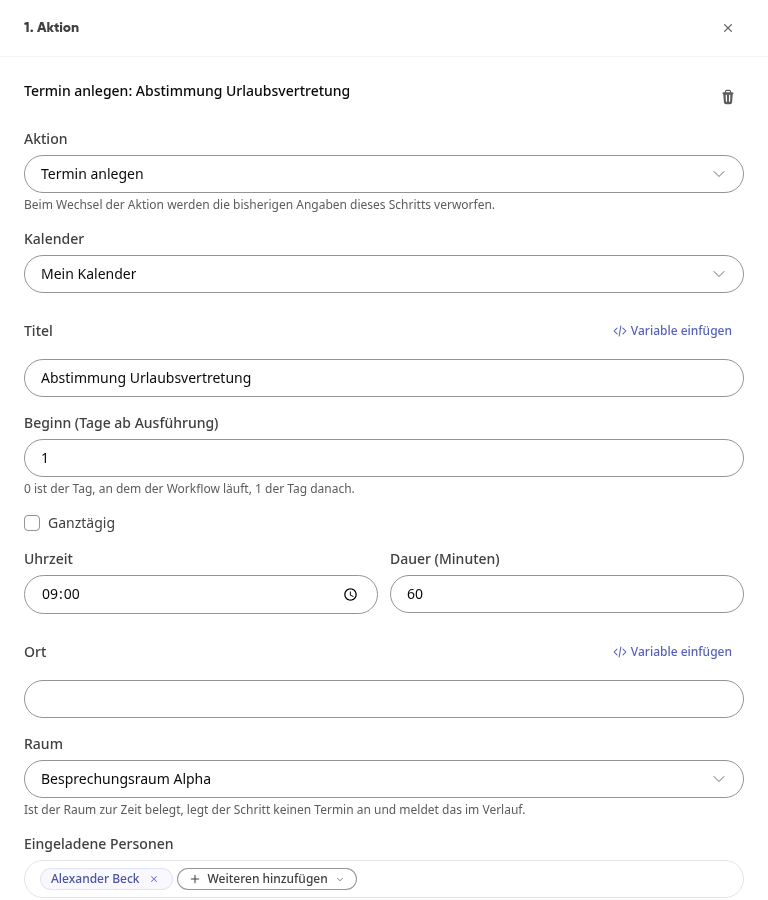
The action Create appointment adds an appointment under Calendar in My Calendar or in the calendar of a group. Under Start (days from execution) you define when it takes place: 0 is the day the workflow runs, 1 the day after. In addition, there are Time and Duration (minutes) or All day, a Location, a Room, and Invited people.
Warning
If the room is occupied at this time, the step does not create an appointment and the run is considered failed. The History tab then shows when the room is occupied. The subsequent steps no longer run.
Save project report#
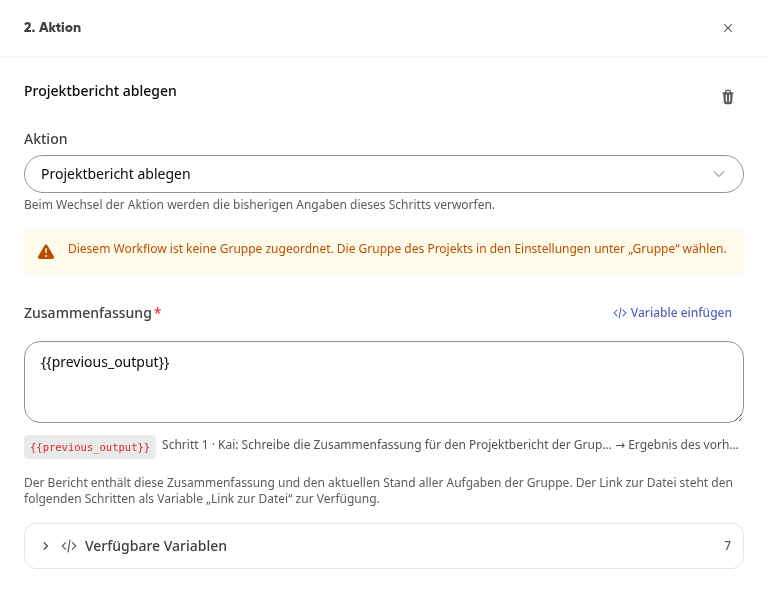
The action Save project report saves a report as a Word file in the folder of the group that you selected in the Options tab under Group. It contains the summary and the current status of all tasks in the group. As the summary, the Project report template uses the response from the previous Kai step. The following steps use the link to the file via the variable Link to file, for example in the chat message to the group.
Info
If no group is assigned to the workflow, the step points this out. The person who set up the workflow must be a member of the group and be allowed to save files in the group folder, and the group must use tasks. Otherwise, the run fails and states the reason in the history.
Create task#
The action Create task creates a task in the selected group. Under Task type, you select one of your company's task types, for example IT ticket or Damage report, or you leave it as No type. Reminder, escalation, and fields then come from the type.
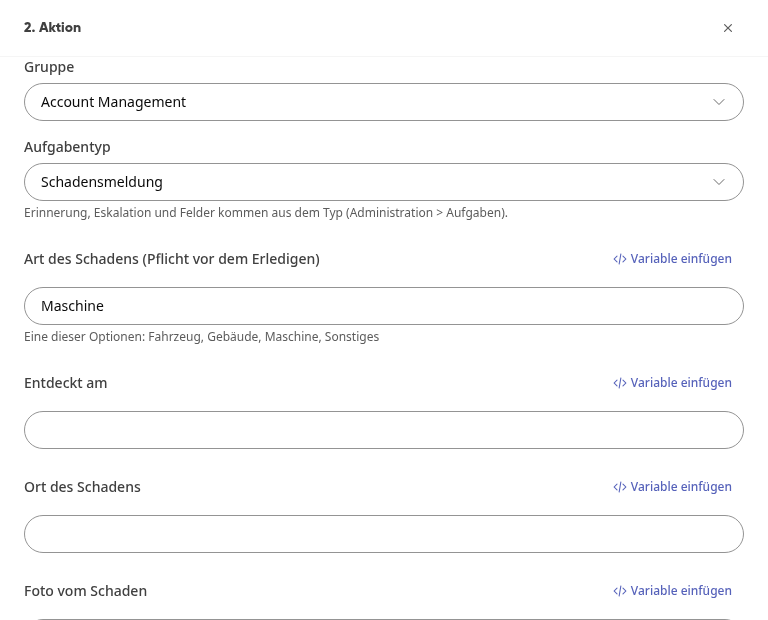
If the type has its own fields, they appear under the task type, for example Type of damage, Location of damage, or Urgency. You fill them with fixed text or via Insert variable with values from the workflow.
Fields that must be filled in before completion are marked with the suffix Required before completion. For selection fields, the note below lists the possible values, such as "One of these options: Vehicle, Building, Machine, Other".
Under Assignment, you select Specific user, Person from the event, or Myself (workflow creator). If you assign the task to a person, that person will be notified.
If a form response starts the workflow, the new task is linked to that response.
Have the post approved first#
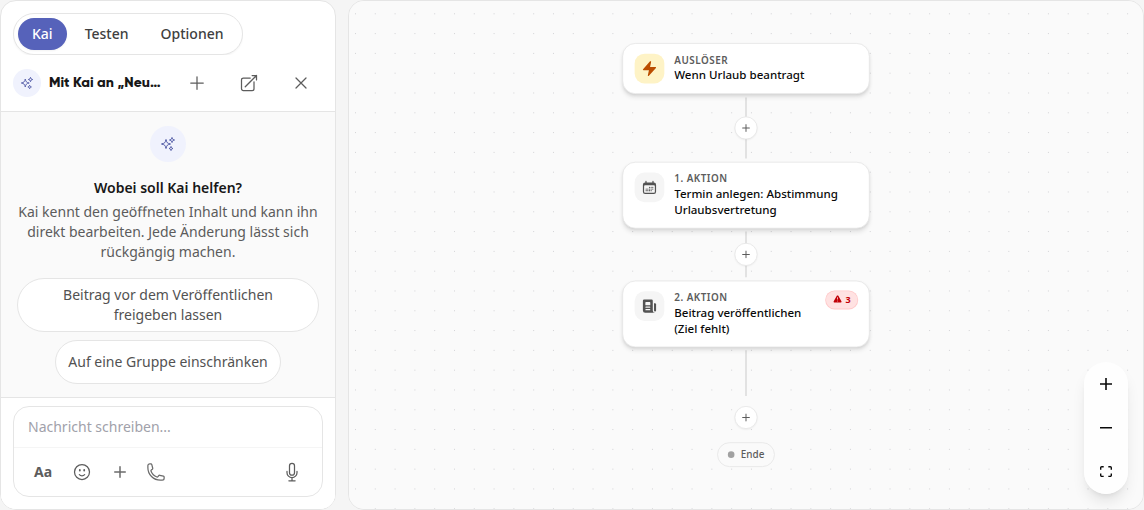
Post to feed publishes the post immediately. If there is no approval step before that, Kai suggests Have the post approved before publishing in the Kai tab. Kai then adds an approval step before it: a person reviews the post, and only after their approval does it appear in the feed.
Tip
In the Kai tab, Kai can help you with the setup, for example via Add condition, Insert Kai step, or Change goal. Every change can be undone.
The Kai Step#
A Kai step lets Kai or an agent complete a task. Under Assign agent, you choose Kai himself or one of your agents. Each execution consumes company credit.
Kai himself: You write the instruction. In the workflow, Kai only reads and writes drafts.
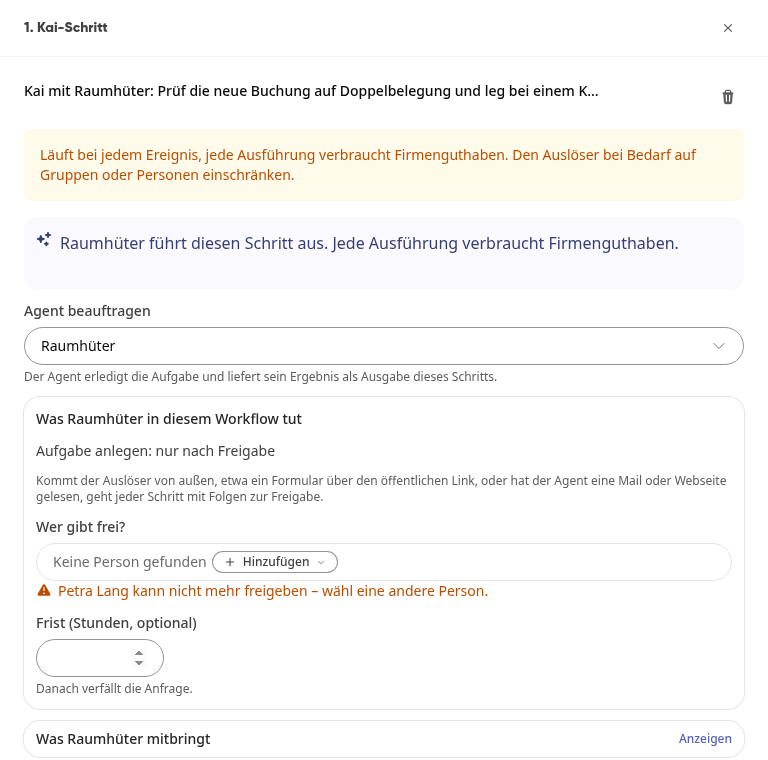
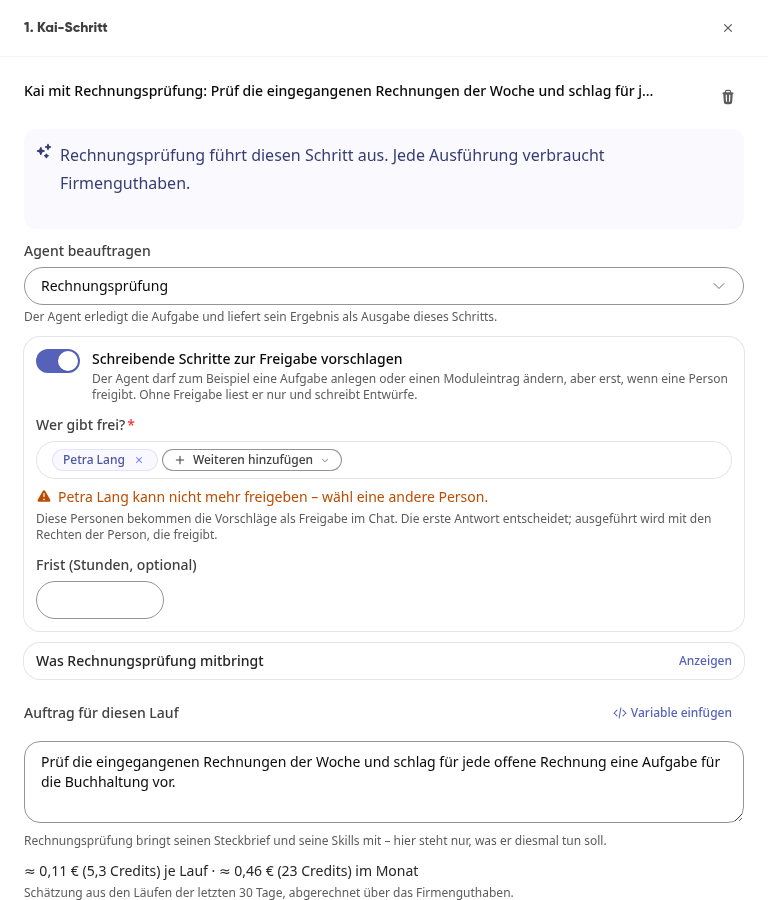
An agent: You write the task for this run. The agent brings its own instructions and skills; here you only specify what it should do this time. Under What … brings along, you can use View to see the agent's role, skills, and permissions. The tile then shows "Kai with …: …" along with the agent's name.
If no agent has been activated yet, the selection is missing. The step then says: "No agent activated yet. Activate your agent under Agents, then select it here. Until then, Kai himself will execute the step."
What an agent does in the workflow without asking is determined by its permissions. The step shows this under What … does in this workflow, for example "Send mail: only after approval", "Create task: without asking" or "depending on the case, without asking or for approval".
Setting | What it does |
|---|---|
Who approves? | If the agent asks, the selected people receive an approval card. The first response decides. If no one is selected, the person under whom the workflow runs approves. The field then names them: "No one selected yet – then … approves, under whom the workflow runs." |
Deadline (hours, optional) | After this, the request expires. |
All suggestions from a run come on one card. You check off each entry individually.
If the trigger comes from outside, such as a form via the public link, or if the agent has read an email or webpage, every step with consequences goes to approval.
A workflow only starts active agents. You first activate a draft under Agents.
Warning
If someone can no longer approve, for example because the account has been locked or removed or the person is now a guest, the Who approves? field warns: "[Name] can no longer approve – choose another person." This applies to every selected person and, if no one is selected, to the person under whom the workflow runs. If their name is no longer known, it says "The person under whom the workflow runs can no longer approve – choose another person." Then choose another person, otherwise the agent's suggestions will remain without approval.
If an agent has no writing skills and therefore no permissions of its own, the step instead shows the toggle Suggest writing steps for approval. If it is off, the agent only reads and writes drafts. If it is on, you must select at least one person under Who approves?. These people receive the suggestions as approvals in the chat, and execution is carried out with the rights of the person who approves.
Content created by Kai is labeled#
Anything produced by a Kai step carries the label Created by Kai. This also applies to actions that follow a Kai step in the same run, and to suggestions that someone later approves.
Tasks, chat messages, appointments, and notifications show the label in the view. Tasks from templates therefore no longer start with the text "Created by Kai:".
For notifications, "Created by Kai" also appears in the push notification on the phone and in the browser, as the first line before the text. If the text already begins with it, such as with notifications from templates, it appears only once.
Emails include a note at the end indicating that Kai created them.
Estimated Cost of an Agent#
If the agent has already had billed runs in the last 30 days, the step below the order shows what a run is expected to cost, for example "≈ €0.11 (5.3 credits) per run · ≈ €0.46 (23 credits) per month". The estimate comes from these runs and is billed via the company balance.
Workflows scheduled by weekday show the run and the month. If the workflow runs Monday to Friday, it says "weekdays ≈ ... per month".
Event-driven workflows only show the run, because how often the event occurs is not known in advance.
Agents without runs do not have an estimate yet. The step then shows the status of the company balance.
Creating a workflow from the agent#
You can start directly with the agent. The new workflow then already includes its trigger and a Kai step for this agent.
Open the Administration and select Agents under AI & Workflows.
Click on the agent and switch to the Who starts tab. If you have changed the agent, save it first.
Under Workflows, click on Create workflow and choose when the workflow starts: At a specific time, On a room booking, When vacation is requested, When a form is filled out, or On a new module entry.
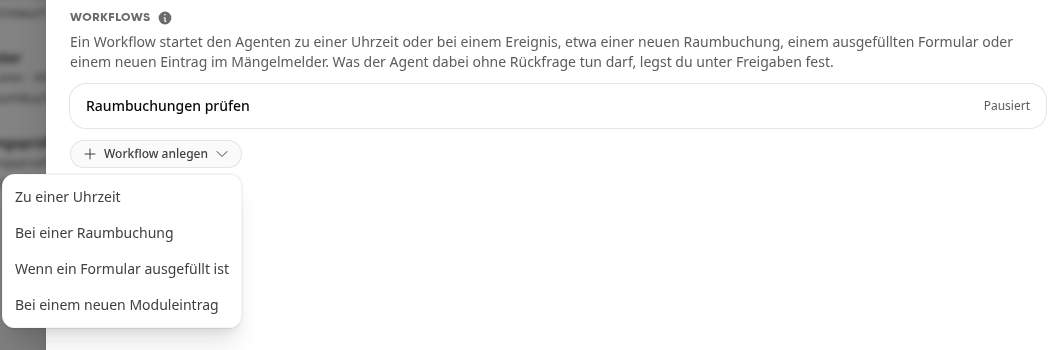
The trigger window is already open. At a specific time starts with Weekly on Monday at 09:00, On a room booking with the event Room booked, When vacation is requested with the event Vacation requested. For the form and the module entry, you choose which one is meant yourself.
Click on the Kai step, enter the task for this run, give the workflow a name at the top, and click on Save.
This workflow is also saved paused.
How to set up agents and their approvals is described in How do I create my own Kai agents?.
Creating a workflow from the Kai chat#
You can also describe a workflow in the Kai chat, for example, "Build me a workflow that reminds me of the weekly report every Monday at 9 a.m."
Kai responds with the button Design in Workflow Studio.

Click the button. A new workflow opens, and your request is already in Kai's input field.
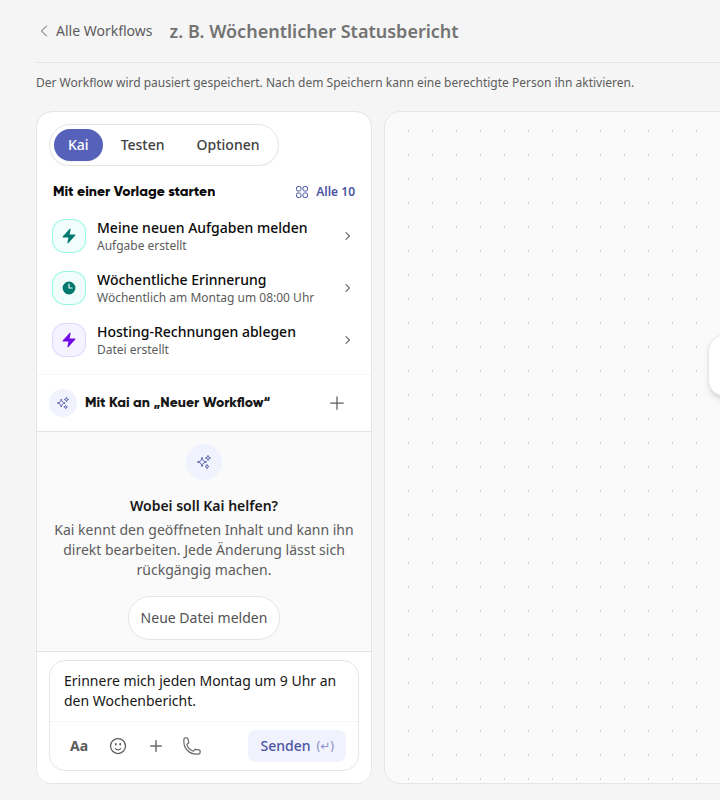
Click Send. Kai designs the workflow.
Review the draft and click Save. Nothing is saved before that.
Testing the workflow#
Select the Test tab on the left.
Click on Start simulation.
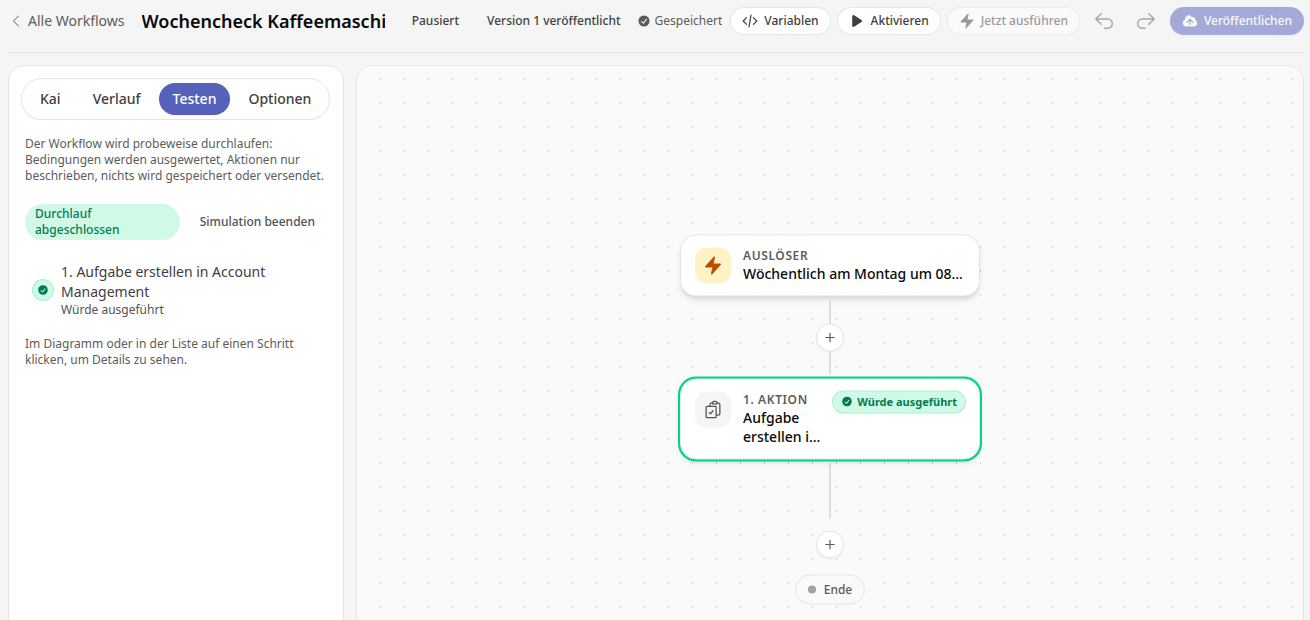
The workflow is run as a trial: conditions are evaluated, actions are only described, nothing is saved or sent. In the list, the result of each step is shown below it, for example Would be executed. Kai steps that were skipped and steps that the trial run did not reach are also named there. Click on a step in the list or in the diagram to see details.
Kai steps only provide a placeholder and are marked as Kai skipped. If they should actually run, check the box for Actually execute Kai steps (consumes company credit) beforehand.
Activating and pausing workflows#
Click on Activate at the top.
Check the summary and confirm with Activate. This takes effect immediately.
Use Pause to stop an active workflow again. If there are still approvals waiting for a decision, the platform will ask with Pause workflow?: Pausing withdraws these approvals, and the affected runs end.
Changing a running workflow#
The editor automatically saves changes as a draft. The active workflow continues to run in the published version.

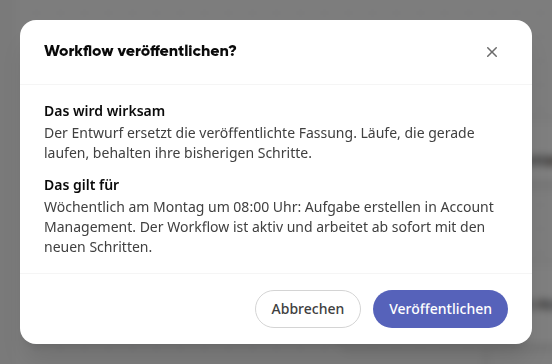
Publish turns the draft into the next version. Before that, the platform asks with Publish workflow?: Under What will take effect, it states that the draft replaces the published version and that runs currently in progress will keep their previous steps. Under This applies to, triggers and steps are listed, and whether the workflow will work with the new steps immediately or, if it is paused, only after activation. Confirm with Publish.
Discard draft reverts the changes.
In the History tab, under Executions, you will find each run, filterable by Successful and Failed. Each run lists its Cost in euros. Under Changes, the versions are listed. You can restore an older one with Restore.
Resuming an interrupted run#
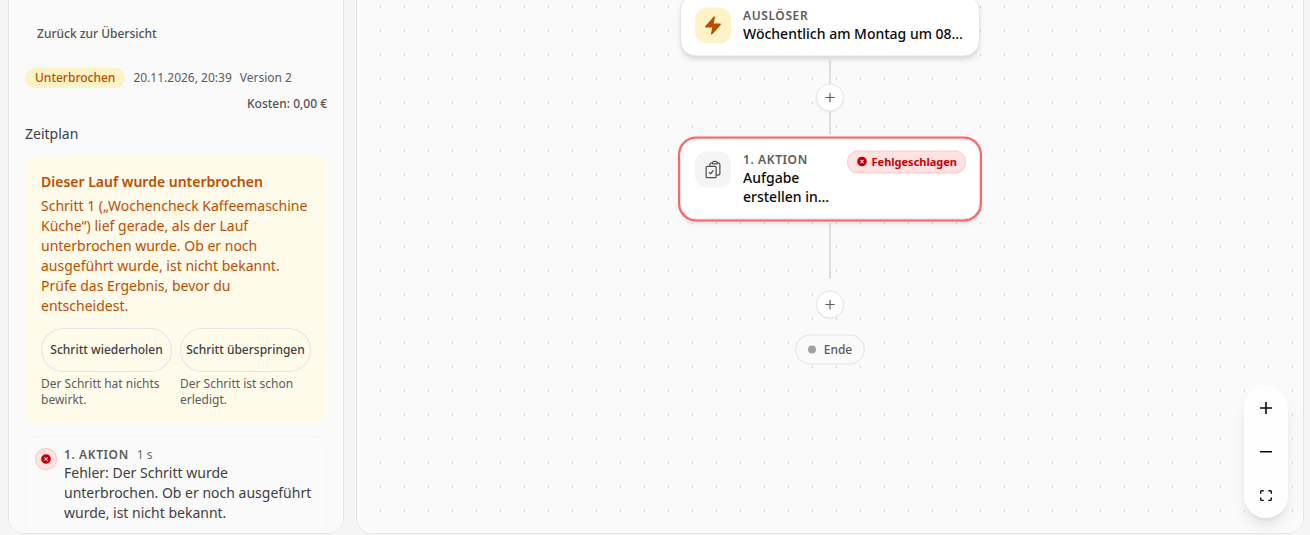
If a run is interrupted mid-execution, for example during a platform restart, it appears in the History tab under Executions as Interrupted. The person who set up the workflow receives a message.
Switch to the History tab and click on the run marked Interrupted.
Read the box This run was interrupted. It names the step at which the run was stopped.
Choose how to proceed:
If all started steps were completed, click on Resume. The run continues with the next step; nothing is executed twice.
If a step was running, it is unknown whether it was still executed. Check the result, for example whether the task or message is already there. If the step had no effect, click on Repeat step. If it is already done, click on Skip step.
The platform reports "The run is being resumed." and the run then shows as Running again.
Info
Resuming is only possible as long as the workflow is active and has not been changed since the interruption. Otherwise, the box states the reason, for example "The workflow has been changed since the interruption. The run cannot be resumed." For interrupted runs of the workflows that come with the platform, the platform asks again in the usual way.
Info
The platform deletes completed runs 90 days after they end, including their logs and approvals. The workflow itself and its versions remain. Runs that are still running, waiting, or have an open approval are kept. If a run belongs to a works council case, it is retained for that case. If the works council has had the personal data of the case removed, the platform empties the run after the same 90 days: The entry remains, but its contents, logs, and approvals are gone.
Options#
In the Options tab, you can set, among other things:
Workflow type: Personal workflows or System workflows. A system workflow is intended for a process of the entire company: everyone who manages system workflows can see and edit it, and it is allowed to write to freely entered email addresses.
Group: It determines who sees the workflow. File actions can be placed in the folder of this group.
Description and tags: at most 10 tags with 30 characters each.
Runs per hour: If the workflow starts more event-driven runs than this number, it pauses itself and notifies you. Manual starts and schedules do not count.
Duplicate workflow: creates a paused copy that belongs to you.
Delete workflow: removes a saved workflow after confirmation with Delete permanently. This cannot be undone.
Important
Runs as shows with whose permissions the workflow operates. It only sees and changes what this person is allowed to see and change themselves.
Module Automations#
The Module Automations tab shows the scheduled processes that modules bring with them, including schedule, status, and last run. This overview is read-only: enabling/disabling or Run now can be found in the module itself under Module Workflows.