
How do I manage my team's time tracking?
Updated Reading time: 6 min
On this page
- Keep an eye on working hours and balances
- Flexitime balance and cumulative balance
- Working time models without fixed weekdays
- Viewing and correcting a person's times
- Assigning a chip or card
- Excluding test and auxiliary accounts
- Carry over remaining vacation to the next year
- Enable vacation for the following year
- Lock a month
- Billing hours
- Check or cancel a billing run
In the time tracking administration, you can view the working hours and balances of all employees, correct entries, lock completed months, and settle hours.
Info
This function is available to HR managers and system administrators. You can find it in the admin area under HR / Personnel > Time & Absences.
Keep an eye on working hours and balances#
Open Time & Absences in the admin area. You will land on the Team overview tab.
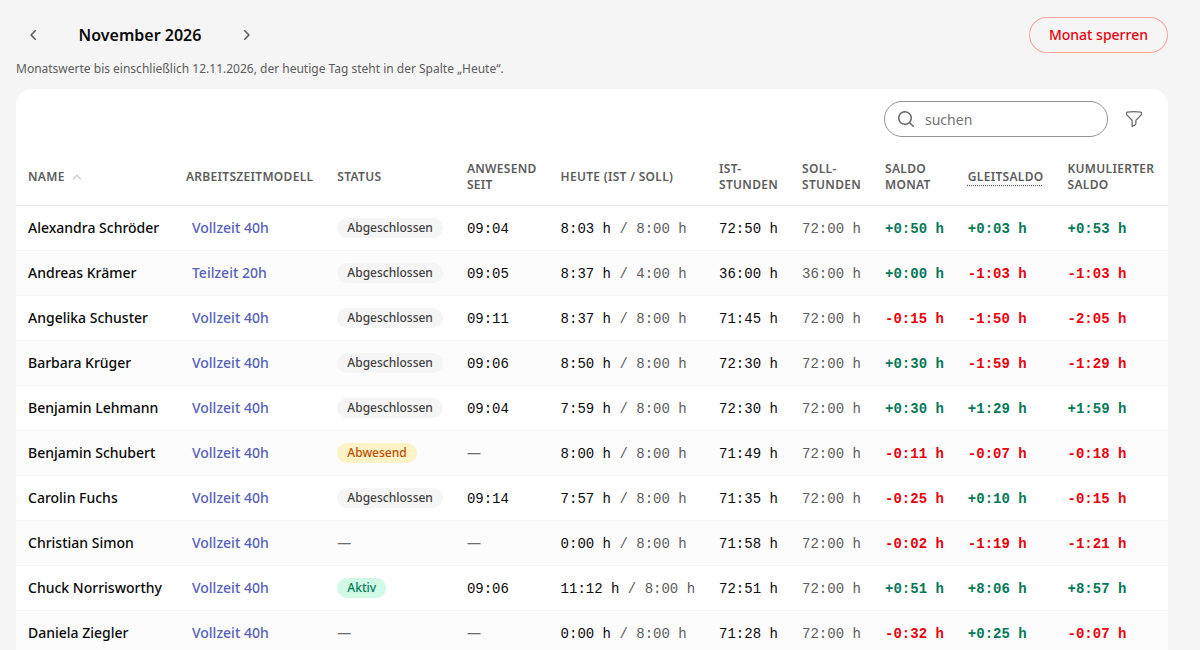
Use the arrows next to the month name to switch to a different month.
Narrow down the list using search or the filter icon. You can filter by working time model, group, and warnings.
The columns show you per person:
Status and Present since: the current status.
Today (Actual / Target): today's day.
Actual hours and Target hours: the monthly values.
Monthly balance: the plus and minus hours of the selected month.
Flexitime balance: the hours the person brings from previous months.
Cumulative balance: the overall status, i.e., flexitime balance and monthly balance combined.
Warnings and Absence days: what you should check.
Info
In the current month, the monthly values extend up to and including yesterday. Today's day is only shown in the Today (Actual / Target) column.
Flexitime balance and cumulative balance#
Click on the column header Flexitime balance to display the explanation.
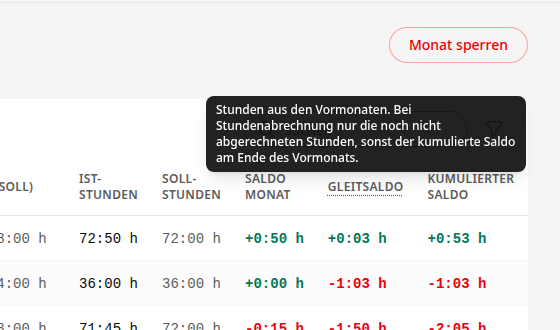
Without hourly billing, the flexitime balance is the cumulative balance at the end of the previous month. Flexitime balance and monthly balance together make up the cumulative balance.
With hourly billing, the flexitime balance only counts the hours from previous months that have not yet been billed. This is the same value that the hourly billing shows as thereof from previous months. The cumulative balance then shows the open balance: all hours that have not yet been billed up to the end of the selected month.
If a person has no working time model, a dash appears in the column.
Working time models without fixed weekdays#
With a working time model of the type Variable, for example for temporary staff or mini jobs, billing only takes place at the end of the month. In the current month, you will therefore see:
Target hours: the entire monthly target, not just the part up to yesterday.
Today (Actual / Target): only the time worked today, without a daily target.
Monthly balance: no minus as long as the month is running. A plus only appears once the entire monthly target has been exceeded.
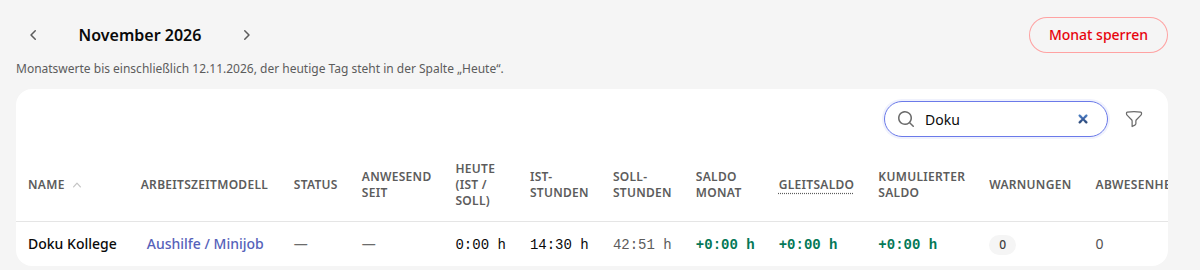
Once the month is complete, Kibi Connect credits the full monthly target. Only then does the balance show whether hours are missing.
Viewing and correcting a person's times#
In the team overview, click on the person's name. Their detail view opens on the right.
In the Month tab, you will see the entries for the selected month. Use the icons at the end of the row to edit or delete an entry, and use Add entry to add a missing one.
In the All times tab, select a period using From and To and view the totals for Worked, Credited, Absence days, and Target.
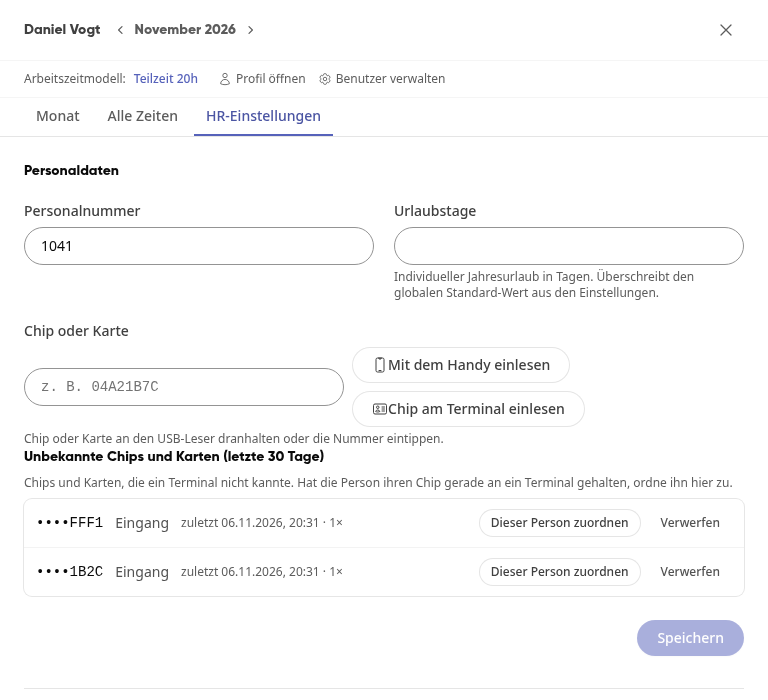
In the HR settings tab, maintain Personnel number, Vacation days, and Chip or card, and click Save. You also assign the working time model there.
Assigning a chip or card#
In the HR settings tab, there is the Chip or card field. The person uses this to clock in at a terminal. You can type in the number, hold the chip to a USB reader, or read it in as follows:
Read in with the phone: Hold the chip or card to the phone.
Read in the chip at the terminal: Select the terminal, click Start reading, and hold the chip to it within 2 minutes. The number will then appear in the field. Click Save to apply it.
If the person has already held their chip to a terminal, it will appear below in the list Unknown chips and cards (last 30 days), with terminal, time, and number of attempts:
Assign to this person: The chip immediately belongs to this person; you do not need to save anything else.
Discard: The entry disappears from the list, for example for a card that is not intended for clocking in.
Info
Read in the chip at the terminal and the list are only visible with the Manage terminals permission. HR managers do not have it by default, but system administrators do. Without this permission, you are left with typing in, the USB reader, and Read in with the phone.
Info
Unknown chips and cards are stored for 30 days and appear only masked. Foreign cards, such as bank cards, can also appear there. More about terminals under Kibi devices and Clock-in terminal (Kibi Terminal S).
Excluding test and auxiliary accounts#
Accounts that should not be included in evaluations, such as test or auxiliary accounts, can be excluded from time tracking. They will then no longer appear in the calendar, team overview, absences, attendance, exports, group reports, and time statements.
Open the Settings tab and scroll to the Excluded from time tracking section.
Under Exclude person, select the person and click Exclude. The message … is excluded from time tracking. appears, and the person is listed above.
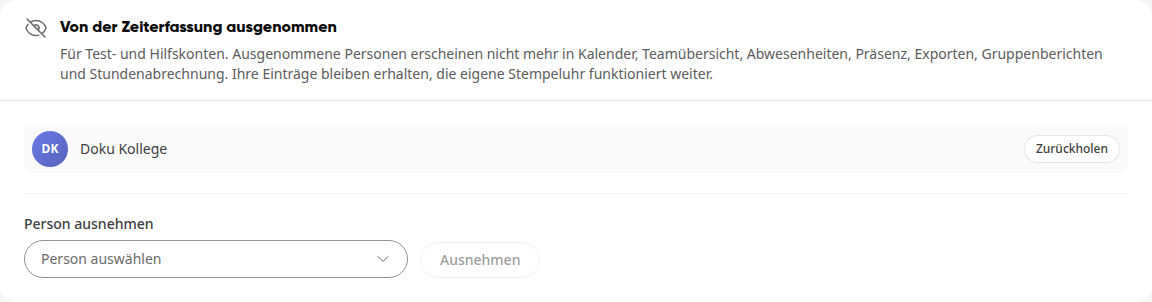
To reinclude a person, click Restore in the list. They will immediately appear again in all overviews.
Info
Nothing is deleted: entries, absences, and balances are retained and will be visible everywhere again after restoring. The excluded person can continue to clock in and out themselves and use their own time tracking.
Carry over remaining vacation to the next year#
You can have unused vacation days automatically credited to the following year. Requested vacation will then use the carried-over days first.
Open the Settings tab and scroll to the Carry over remaining vacation to the next year card.
Enable Automatically carry over remaining vacation to the next year.
Under Carry over starting from vacation year, enter the year whose remaining days will be carried over first. Earlier years remain unchanged.
If needed, limit the carry-over under Maximum number of days that can be carried over. If no limit is specified, the entire remaining balance will be carried over.
Under Carry-over expires on, select the date in the date field on which the carry-over expires. The default is March 31, the legal deadline. The field shows the date in the following year; only the day and month are saved, so the rule applies every year. If the carry-over should remain valid for the entire year, check the No expiration box.
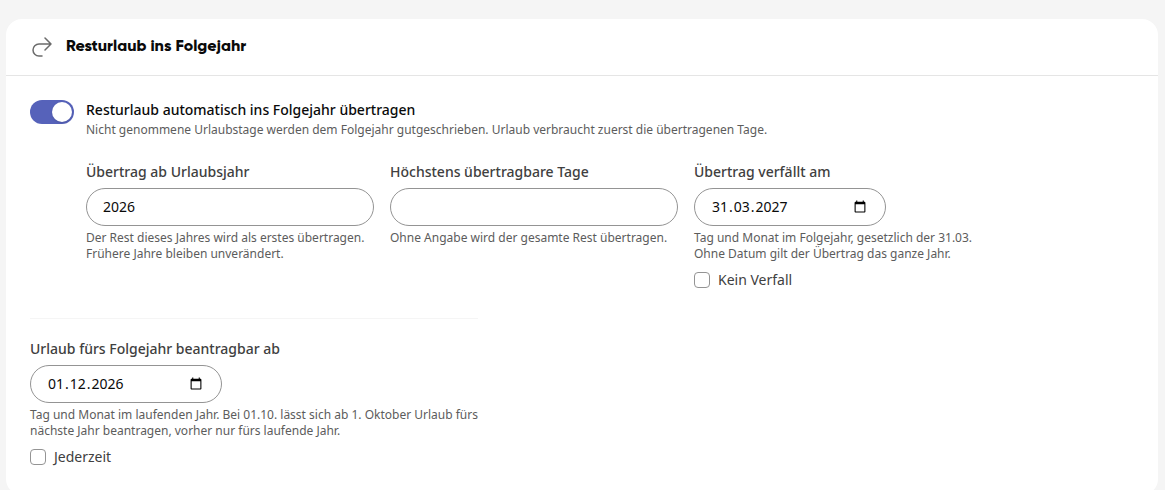
Click Save at the top.
Enable vacation for the following year#
You define the date from which employees can request vacation for the next year. Without a cutoff date, this is possible at any time. This setting is located in the same card, but it also applies without a carryover.
Open the Settings tab and scroll to the Carry over remaining vacation to the following year card.
Under Vacation for the following year can be requested from, uncheck the At any time option.
Select the cutoff date in the current year in the date field. With 01.12., vacation for the next year can be requested from December 1st, before that only for the current year. Here too, only the day and month count; the cutoff date applies every year.
Click Save at the top.
Until the cutoff date, the request form shows employees the date from which they can request vacation for the next year and does not allow the request. Requests for subsequent years remain blocked.
Info
The cutoff date only applies to absence types that are deducted from vacation. Sick leave or training sessions are not affected. Absences that you enter yourself as HR for a person can also be recorded before the cutoff date.
Lock a month#
In the team overview, open the month you want to close.
Click on Lock month and confirm the prompt.
Warning
Locking cannot be undone. It applies to all time entries for the month. In a locked month, the Lock month button is grayed out.
Billing hours#
The Hourly billing tab only appears once hourly billing is enabled in at least one working time model. How to do this is described in How do I maintain working time models?. Worked hours then remain open until you bill them in a billing run. In the Team overview, you can see these open hours per person in the Flexitime balance and Cumulative balance columns.
Open the Hourly billing tab. At the top you will see Total open, Employees with balance, of which frozen, and Growing balances, below that the Open hour balances per person. All hours are shown as hours:minutes, for example 5:28 h.
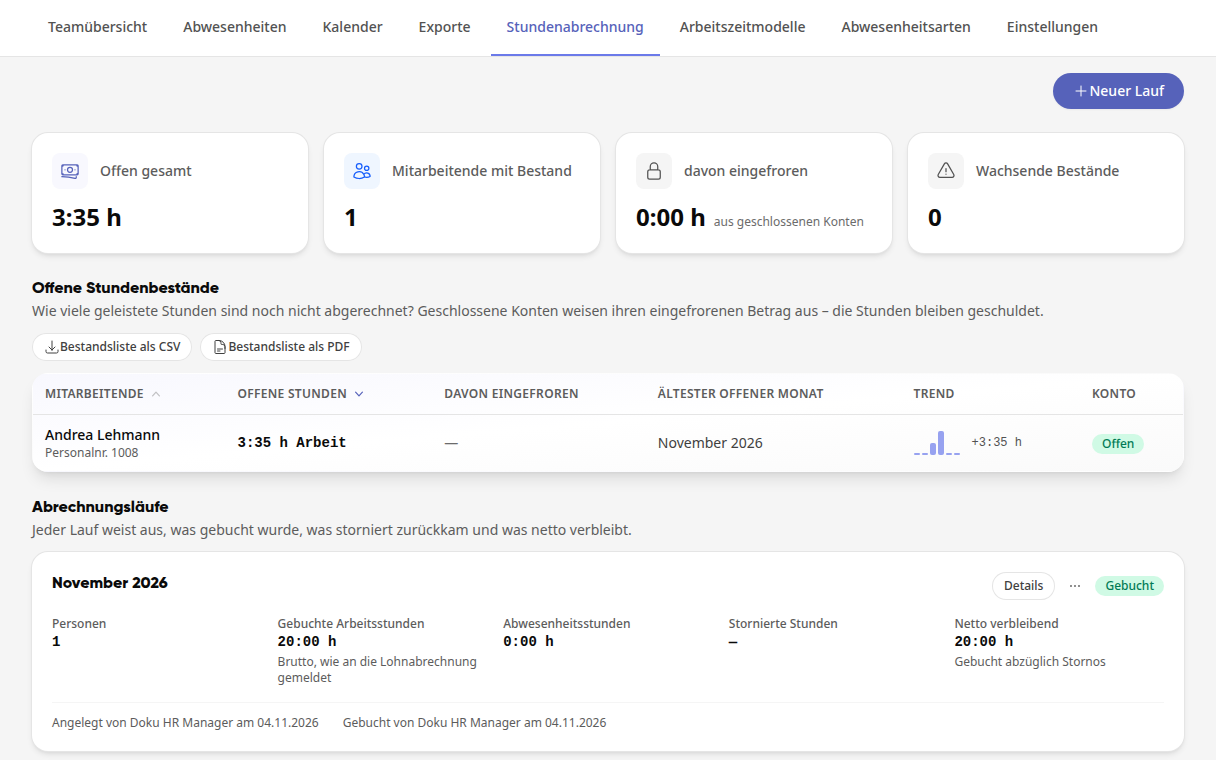
Click on New run, select the billing month, and click on Load proposal list. The current month and the months before it are available for selection.
Check the rows. Deselect anyone you do not want to bill, and adjust To be billed (hrs) if necessary. The field starts as hours:minutes (20:00) and also accepts decimal numbers (20.5). Remains open is calculated immediately.
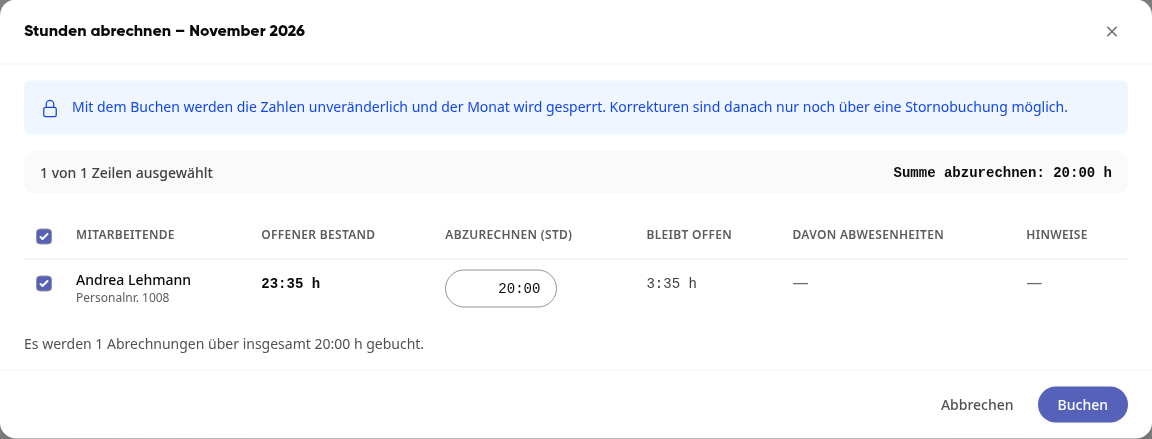
Click on Book. The figures are then immutable, and the month is locked.
Tip
If To be clarified before booking appears above the list, something is still missing, for example a wage type. Enter it under Settings in the DATEV LODAS section and continue with Continue. A canceled run remains as a draft in the Billing runs list. You can remove it again using Discard.
Check or cancel a billing run#
In the Billing runs list, click on Details for the desired run. Use DATEV, CSV, and PDF to download the run's documents.
Click on Proof for a booking to view the balance and basis of the booking.
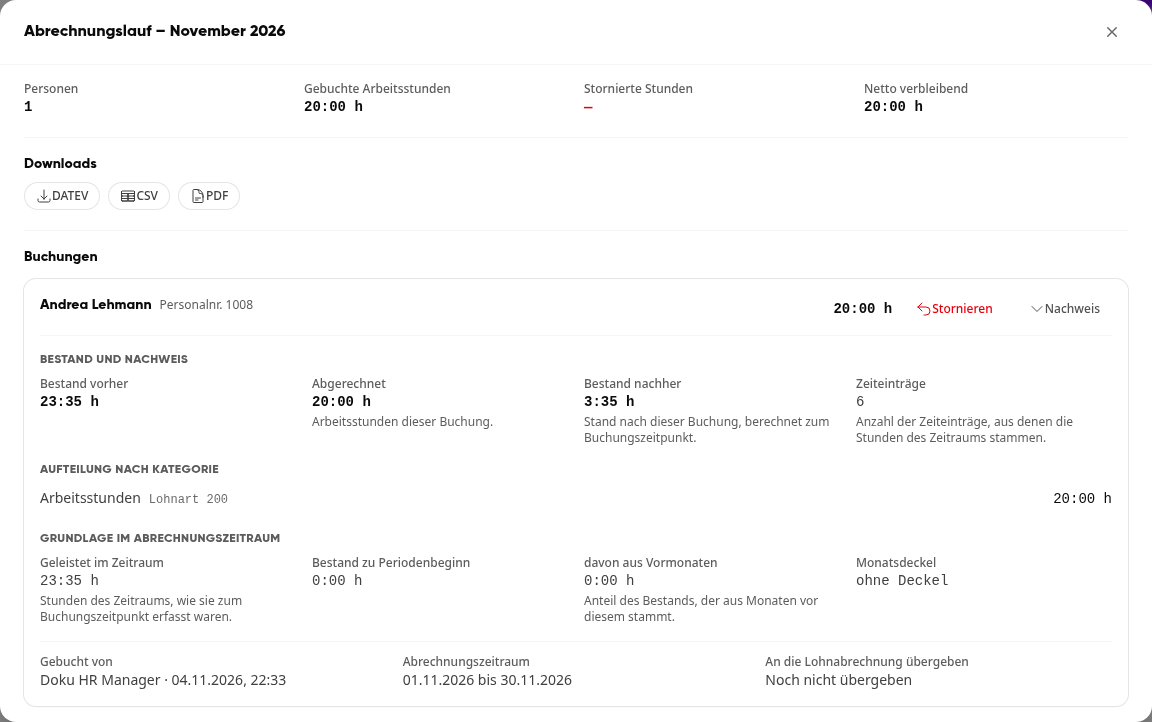
To reverse a booking, click on Cancel, enter the Reason for cancellation, and click on Create reversing entry.
Info
The original booking remains in the history, with the reversing entry next to it. The canceled hours are then open again.