
Kibi devices
Updated Reading time: 13 min
On this page
- Instructions
- Three tabs by purpose
- Who is allowed to do what
- Pair Kibi device
- New Kibi device found
- Serial number and hardware
- Costs
- Terminals
- Unknown chips and cards
- Open a Kibi Terminal
- Settings on the terminal
- Kumpel
- Data protection and co-determination
- Displays in detail
- Requirements for screen and player
- Start display on screen
- Create and assign playlist
- Design slides and tiles
- Show tasks on the display
- Websites on displays: Zoom and slow scrolling
- Zoom
- Slow scroll
- Symbols in the slide bar
- Playlists at specific times
- Rules
- Example
- Display in operation
- Logo on the display
Under Administration → Kibi Devices, you manage all devices on which Kibi runs for your operation: displays, terminals, and Kumpel, regardless of whether it's your own hardware or ours. Previously, the menu items were called Displays and Kumpel. Old links and bookmarks are automatically redirected.
Instructions#
Three tabs by purpose#
Tab |
What you find there |
|---|---|
Displays |
Info screens in the operation. At the top, you switch between Screens and Content. Under Content, you design playlists with slides, schedules, and greetings. |
Terminals |
All displays in Terminal mode: time tracking, room, kiosk, and output. Regardless of whether it's a tablet or Kibi Terminal. |
Kumpel |
The personal Kumpel of your team. |
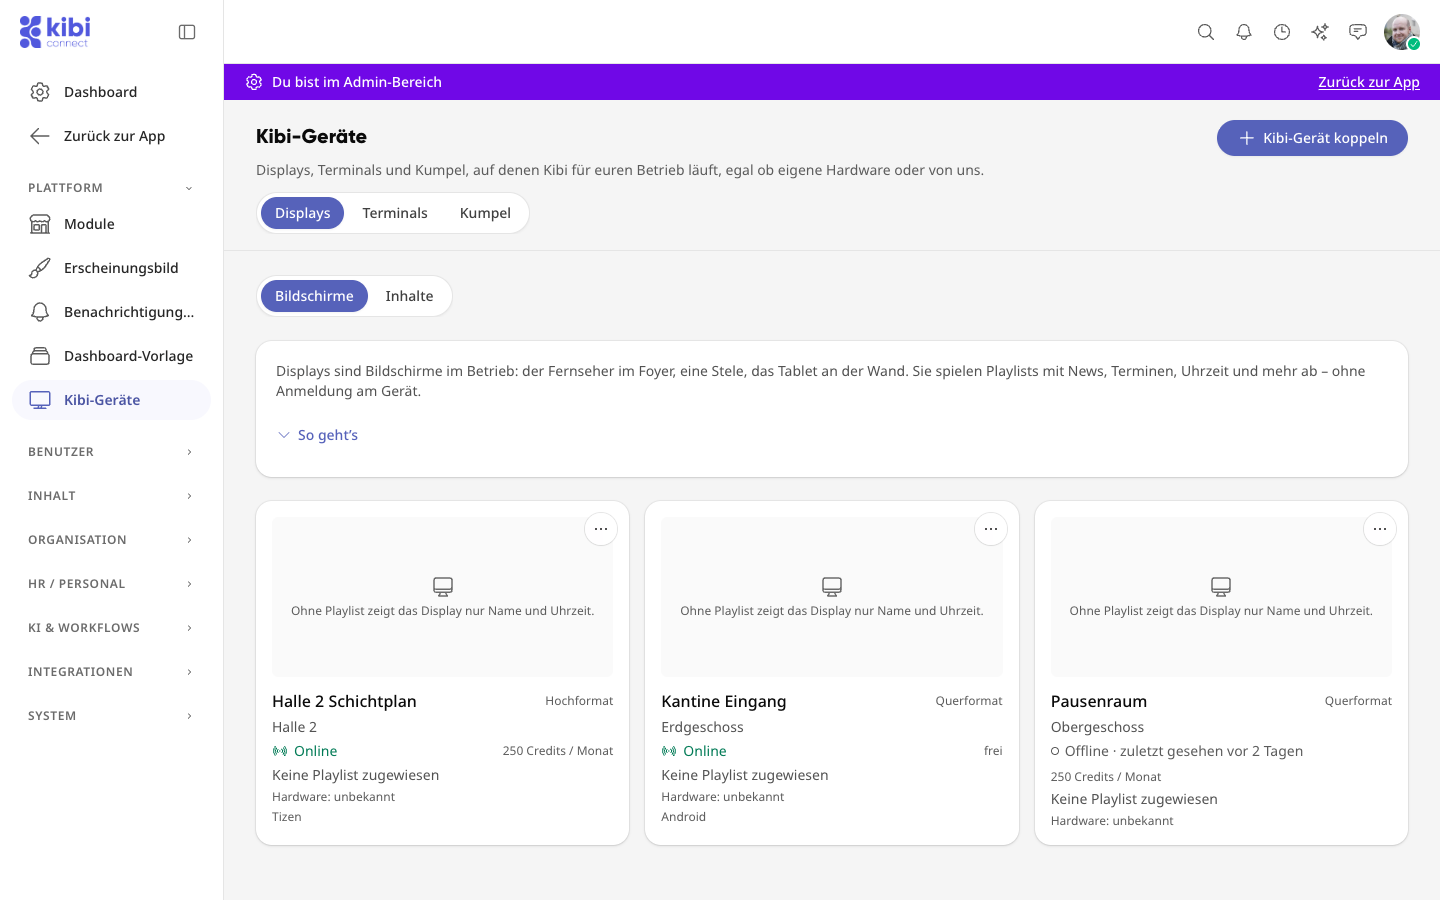
In the Terminals tab, you search by name or serial number; in the Kumpel tab, by name, person, or serial number.
Who is allowed to do what#
You assign permissions in role management under Kibi Devices. There are three permissions that you can assign individually:
Manage Displays: Displays tab.
Manage Terminals: Terminals tab.
Manage Kumpel: Kumpel tab.
Each person only sees the tabs for which they have permission. If you want to turn a display into a terminal or vice versa, you need both permissions: Manage Displays and Manage Terminals.
Info
Existing permissions have been transferred. Nevertheless, briefly check who should manage terminals in your company. How to assign permissions is explained under Roles & Permissions.
Pair Kibi device#
For all devices, there is a button: Pair Kibi Device at the top right.
The device displays a code.
Click on Pair Kibi Device, enter the code, and click Next.
Kibi recognizes what kind of device it is. It automatically lands in the appropriate tab.
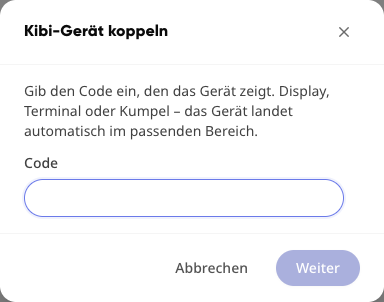
Display: You specify the name and format and click Pair. The screen switches automatically.
Kibi Terminal: Kibi suggests a short name, for example Terminal 1, Terminal 2, and so on. Keep the name short; it appears on the device.
Kumpel: Kibi asks For whom? and you select the person. More on this under Manage Kumpel.
Tip
If you set a display to Terminal mode, it moves to the Terminals tab. Kibi then shows Moved to Terminals. Conversely, Moved to Displays appears.
New Kibi device found#
If a device is waiting to be paired, you don't need to know: Kibi shows it to you as a card New Kibi Device Found, for a terminal as New Terminal Found. Above it, for example, it says "1 Kibi device waiting to be paired".
On the card, you see which device is waiting (if recognizable, otherwise "Unknown Device"), since when ("Waiting since 9:41 AM"), its public IP, for our devices the serial number, and whether it is on the same network as you.
"On the same network as you": Click Pair Now. Check the name and details and confirm. No code is needed.
"Different network": Click Pair with Code and enter the code displayed by the device.
Not pairing right now: Click Ignore. The suggestion is then hidden for 24 hours.
Info
What does "on the same network" mean? Your computer and the device access the internet with the same public IP address, usually because both are on the same company network. If the device is at a different location or on a different network, pair it with the code. This way, no one from outside can substitute a foreign device.
The card disappears as soon as the device is paired or if it has not been waiting for about 15 minutes.
Serial number and hardware#
Serial number: Our devices have a serial number in the format SN: KD-XXXX-XXXX, for example KD-6ED3-4BF0. You see it in the list, on the New Kibi Device Found card, and in the detailed view. Kumpel are named after their serial number.
Hardware: For each device, it shows what it is, as reported by the device. For example, "Samsung Smart TV", "Android Tablet", "iPad", "Kibi Terminal S", or "Kibi Kumpel". If a device reports nothing, it says "unknown".
Costs#
Important
Displays and terminals cost 250 credits per month per device, regardless of the hardware. The first device is free. A terminal counts as a display. If a device is added during the current month, it is calculated proportionally. The personal Kumpel is included in the license, one per person, and does not cost any credits. During the test period, everything is free. More about the credit balance under Subscription & Licenses.
If the credit balance is insufficient, the device pauses until there are enough credits again. Administration receives an email and the note "Kibi devices paused".
Terminals#
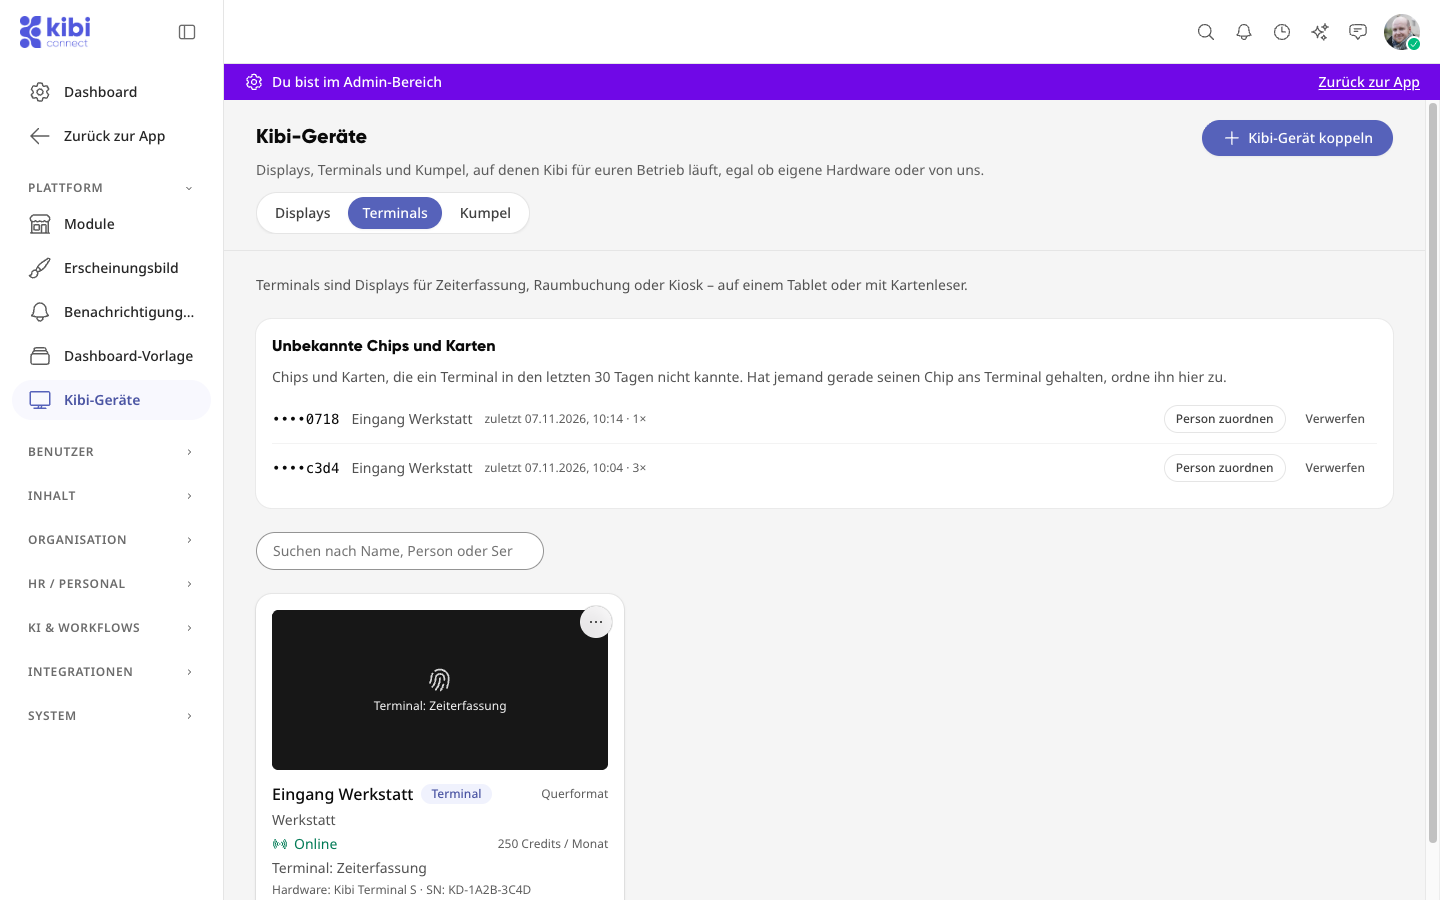
In the Terminals tab, all displays in Terminal mode are listed, regardless of whether they are tablets or Kibi Terminals. Each terminal has a function: time tracking, room, kiosk, or output.
Unknown chips and cards#
At the top of the tab is the list Unknown Chips and Cards. This contains chips and cards that a terminal did not recognize in the last 30 days. If someone has just held their chip to the terminal, you will find it here.
Assign person: Select who the chip or card belongs to. For this, you need the permission to edit HR data.
Discard: The entry disappears from the list. This is correct for cards that are not intended for stamping.
You can also assign chips directly to the person, see How do I manage my team's time tracking?.
Open a Kibi Terminal#
With a Kibi Terminal, you see an image of the terminal screen instead of the live preview.
Identify terminal: The terminal blinks and beeps briefly. This helps you find it if there are multiple.
Device card: Serial number, model, firmware version, card reader, Wi-Fi signal, LAN IP, MAC, last restart, public IP, and when the information was recorded.
Warning
Terminal not reporting? Check three things: Does the terminal have power, i.e., is the power supply plugged in? Is it on the Wi-Fi? Otherwise, the device says "No Network". Does the display show an error message? It says what is missing.
Settings on the terminal#
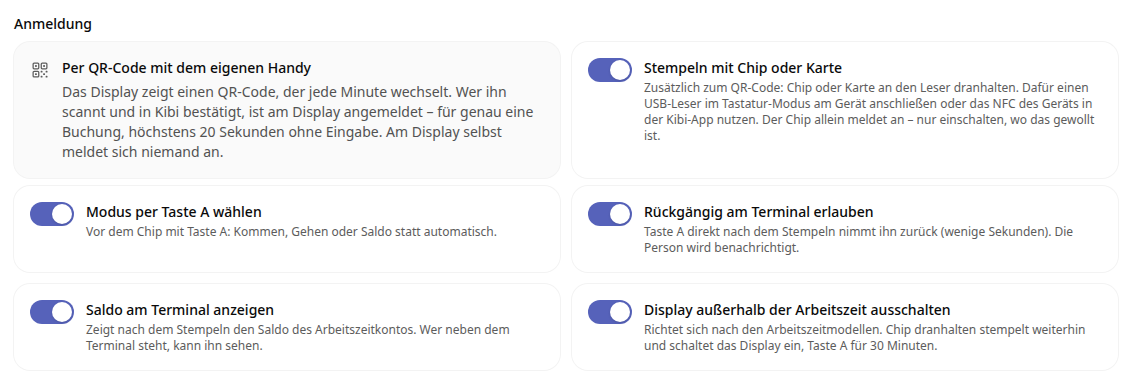
With the switch Stamp with chip or card, you determine whether stamping is done with a chip or card at the terminal. If it is turned on, there are four additional switches for the time tracking function. All four are enabled by default:
Switch |
What it does |
|---|---|
Select mode via button A |
Employees select what should happen at the terminal before stamping. |
Allow undo at terminal |
If someone makes a mistake, they can undo the stamp directly at the terminal afterward. The person receives a message for this. |
Show balance at terminal |
After stamping, the terminal briefly shows the balance of the working time account. |
Turn off display outside working hours |
The Kibi Terminal S turns off its display outside working hours. Holding a chip to it still stamps and turns on the display; button A wakes it for 30 minutes. |
When the display is on: This is determined by the working time models of the people who can stamp at the terminal: from the earliest frame time to the latest, per day of the week. If a model has no frame time, the core time plus or minus two hours applies; otherwise, Monday to Friday 6 AM to 8 PM. This also applies if there are no models. A change to the working time model arrives at the terminal within five minutes. If you turn off the switch, the display stays on permanently.
Warning
Balance at terminal: Anyone standing next to the terminal can see the balance. If you have a works council, include this setting in the works agreement.
How employees stamp at the terminal is explained under Stamp Terminal (Kibi Terminal S).
Kumpel#
In the Kumpel tab, you find the personal Kumpel of your team. Issuing, transferring, and removing is described in Manage Kumpel. The list shows for each Kumpel:
Person, name, and serial number: Kumpel are named after their serial number.
Hardware: Kibi Kumpel.
Battery: Charge level with timestamp. If the information is older than 12 hours, it turns gray and is marked as "outdated".
Mode and last seen.
Costs: "free", because the personal Kumpel is included in the license, or "—", as long as the person has not yet released the Kumpel.
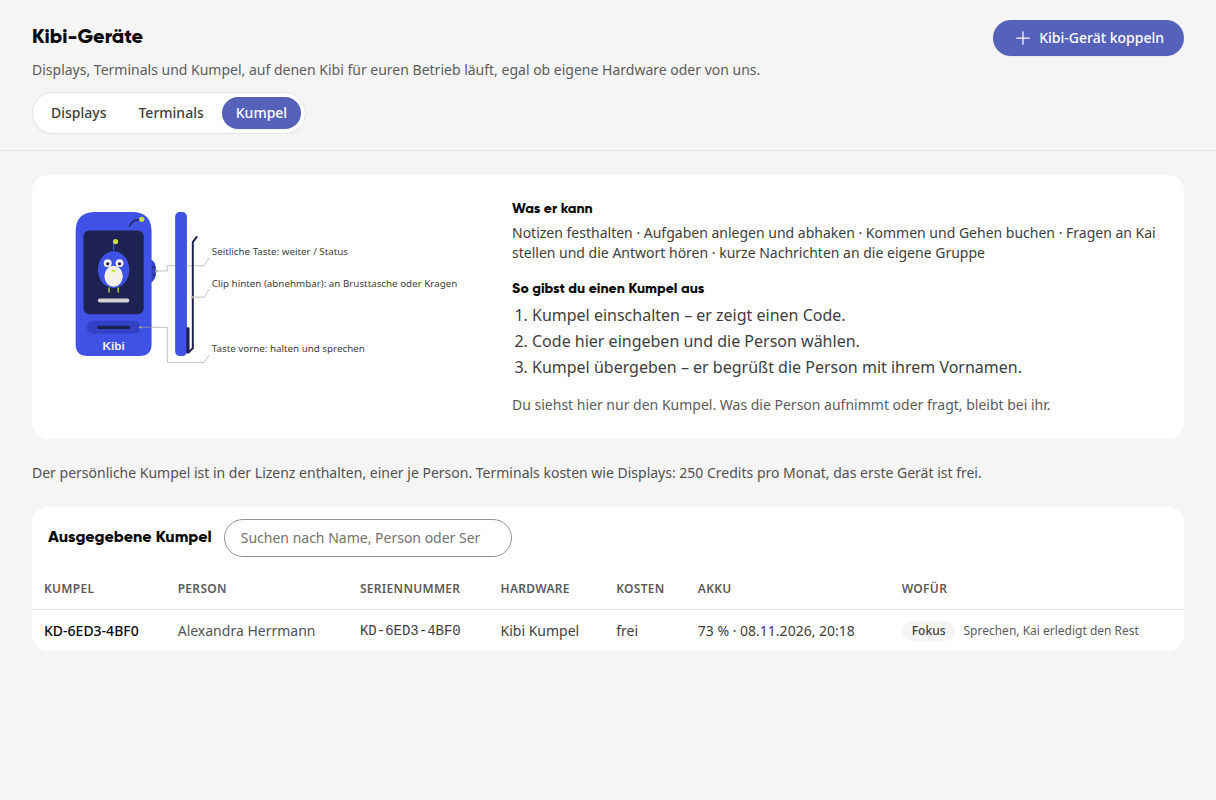
Set up a new Kumpel without Wi-Fi via USB-C: Set up Kumpel via USB-C. If it is on Wi-Fi, pair it with the code via Pair Kibi Device, or the person pairs it themselves: Pair Kumpel via code or QR.
Data protection and co-determination#
Unknown chips and cards are stored by Kibi for 30 days. You only see the numbers masked.
Foreign cards may also appear in the list, for example, a bank card that someone accidentally holds to the terminal. Discard such entries.
Electronic time tracking is subject to co-determination. If there is a works or staff council, involve it before introduction.
Displays in detail#
Displays are screens in the operation: the TV in the foyer, a stele, the tablet on the wall. They play playlists with news, appointments, time, and more without logging in on the device. In the Displays tab, under Screens, you find your screens; under Content, you design what they show.
Requirements for screen and player#
You can find the display address under Administration → Kibi Devices, Displays tab under How to. An HTML5-capable browser or player must be able to open it. For each display, you choose one of these formats:
Landscape (16:9): 1920 × 1080 (Full HD) or 4K, for TVs and monitors from 43" in the foyer or break room, easily readable from about 3 m.
Portrait (9:16): 1080 × 1920 or 4K portrait, for steles and portrait-mounted monitors, e.g., at the entrance.
Tablet landscape or tablet portrait (16:10): from 1280 × 800, for tablets from 10" as a door sign, terminal, or at the canteen counter.
We take care of the content on the address. You are responsible for the technical implementation, i.e., hardware, player, and internet.
A few helpful tips for your monitor:
Ideally, use a monitor designed for digital signage. It handles continuous operation better.
Depending on the location, you should pay attention to brightness.
A matte coating (anti-glare) prevents annoying reflections.
With a high-quality screen (IPS/VA panel), you can see the content well from the side.
Disable energy saving and screen saver on the device and open the browser in full screen.
Many player apps reload the page regularly. Disable this or set it to at least as long as the playlist duration. The display updates itself as soon as something changes.
Start display on screen#
Open the display address on the screen. Or click Use as Display on the device's login page. Then the platform first asks whether the device should really become a display: With Use as Display, it continues; with Cancel, you stay on the login page.
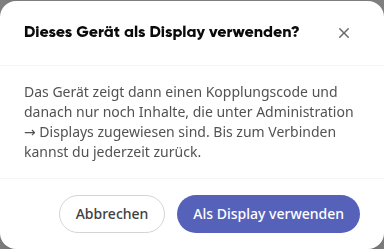
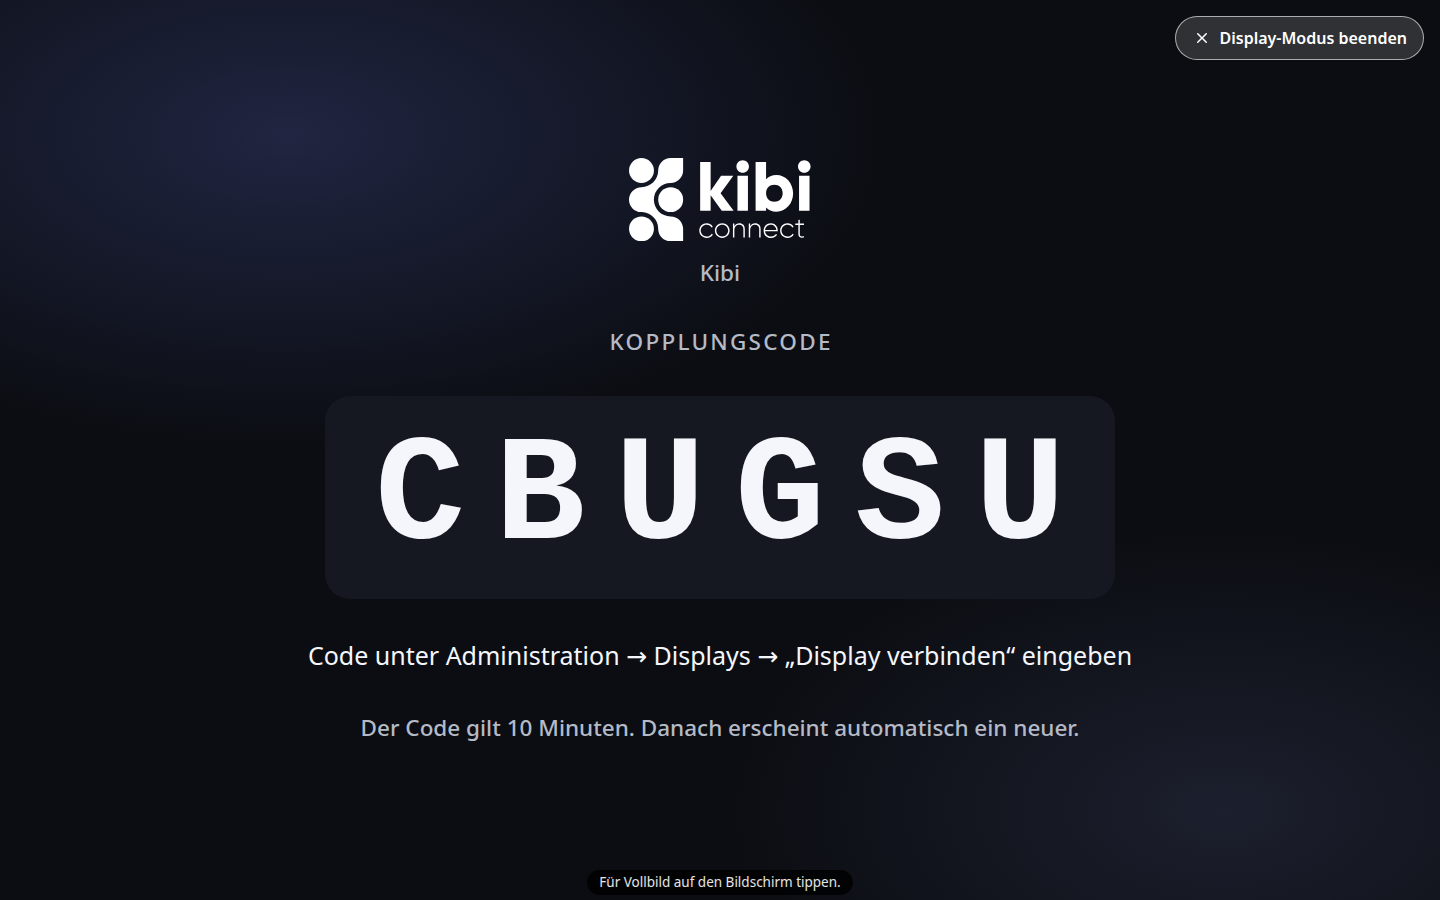
The screen displays a pairing code that is valid for 10 minutes. After that, a new one appears automatically.
Tip
Accidentally made a device into a display? Click End Display Mode at the top right. In the browser, you return to the platform; in the Kibi app, the display mode ends. The button is only available as long as the display is not yet connected.
Afterward, pair the screen as described above under Pair Kibi Device, with the code or via the New Kibi Device Found card.
Create and assign playlist#
A playlist is what a display shows: a sequence of slides that run one after the other. Multiple displays can play the same playlist.
Open the display and click New Playlist in the Playlist section. Alternatively, you can find New Playlist under Content.
Enter a name and select what the playlist should start with: Empty or a template such as Break Room, Foyer, Greeting, Info Wall, Canteen, or Kitchen.
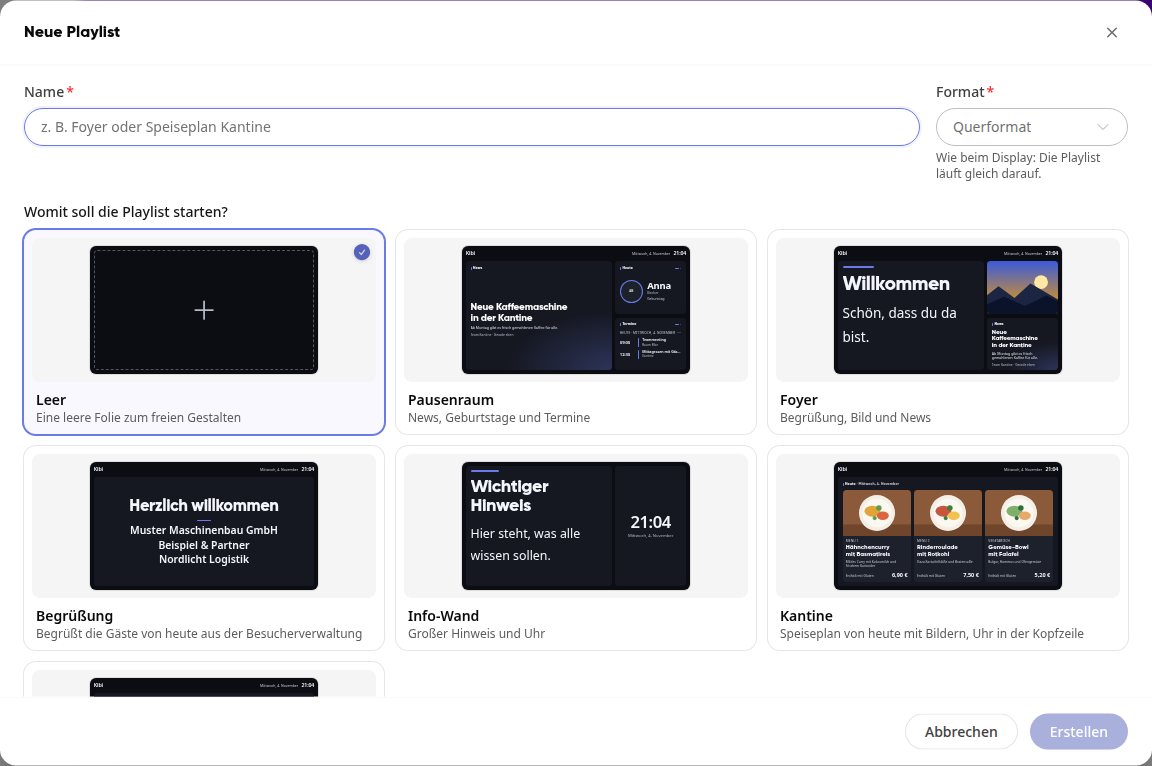
Click Create. The playlist opens in the studio. If created from the display, it runs there immediately.
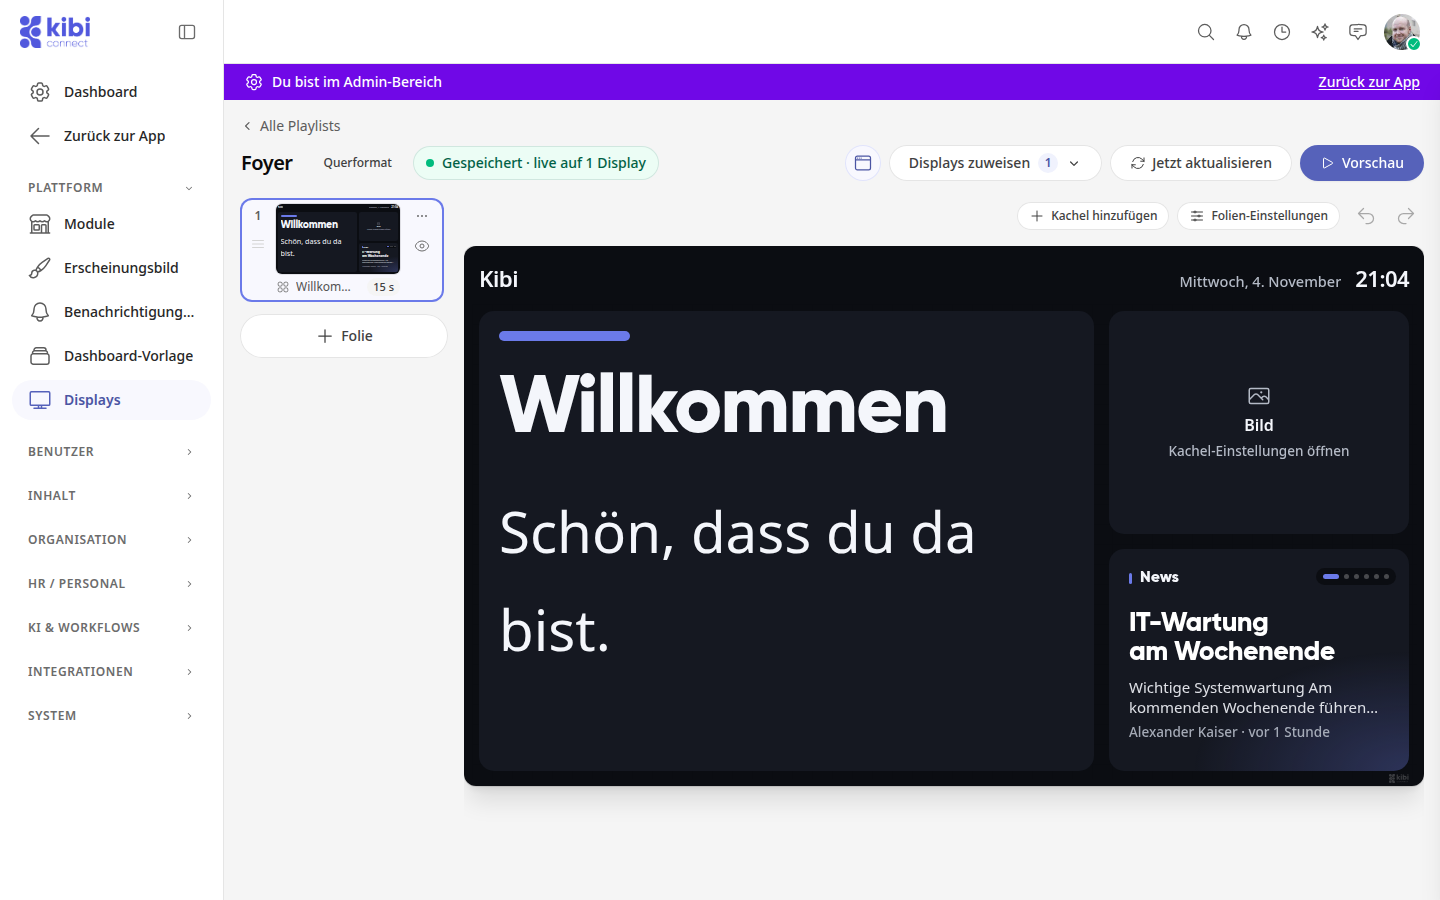
Use Assign Displays to specify on which displays the playlist runs. Preview shows it as the display plays it.
Design slides and tiles#
Use Slide to add a new slide: Tiles, Notice, Full-screen image, Full-screen video, or Full-screen website. As long as the playlist is running on displays, new slides start hidden. This way, you can finish them in peace.
On a tile slide, you add content via Add Tile, for example:
Communication: News, Magazine Cover
Organization: Calendar (List), Events, Tasks, Attendance, Menu, Kitchen, Greeting
Content: Free Content, Custom HTML, YouTube Video, Image, Video, Website, Clock, Weather
Under Slide Settings, you specify whether the slide is visible on displays, how long it runs (Duration (Seconds)), and when (Schedule). Without days of the week and time, the slide always runs.
Show tasks on the display#
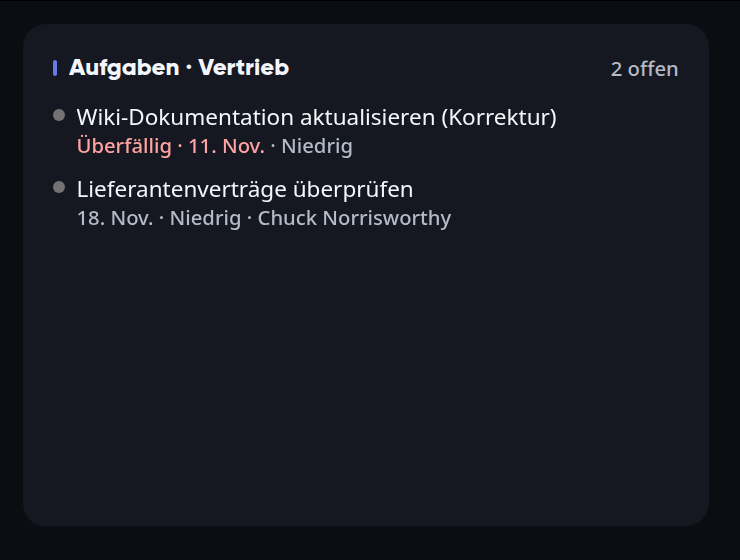
With the Tasks tile, a display shows open tasks, for example, the tasks of a team on the TV in the office. Each task is listed with title, due date, and priority; overdue tasks are in red. At the top right, it shows how many tasks are open.
Open the playlist in the studio, click Add Tile, and select the Tasks tile under Organization.
Click on the tile and then on the gear icon. The tile settings open on the right. You see every change immediately in the tile; it saves automatically.
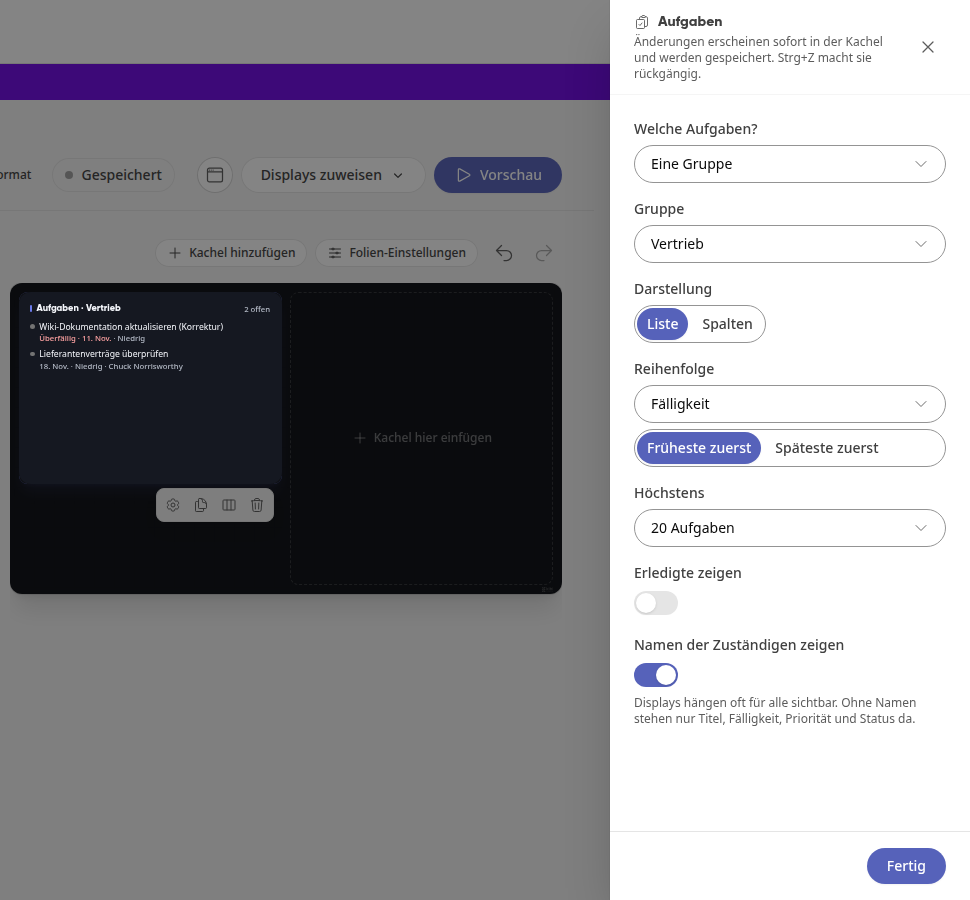
Under Which tasks?, select where the tasks come from.
Set Display, Order, and Maximum, and click Done.
Setting |
What it does |
|---|---|
Which tasks? |
Display groups: the open tasks of the groups set on the display. One group: the tasks of a group that you select under Group. It appears on every display that shows the playlist. My tasks: your own open tasks. |
Display |
List or Columns. With exactly one group, the tile shows the columns of its board; otherwise, Todo, In Progress, and Done. |
Order |
Manual (by dragging), Due date, Priority, or Created at, each in both directions, for example Earliest first or Latest first. |
Maximum |
5, 10, 20, 30, or 50 tasks, per column if applicable. If not all fit on the tile, it scrolls automatically. |
Show completed |
Also shows completed tasks. |
Show names of responsible persons |
Shows who is responsible for a task. Disabled by default. |
Info
Only groups that use the Tasks tool and that you yourself can see are available for selection. Each person can only bring their own tasks to a display. If someone else has set My Tasks, the tile shows their tasks. With Show my tasks instead, you take them over for yourself.
Warning
Displays are often visible to everyone. Without the Show names of responsible persons switch, only title, due date, priority, and status are displayed. Descriptions are never shown by the tile.
Without an assigned display, the preview in the studio only shows a selected group or your own tasks. A display fetches the tasks every two minutes.
Websites on displays: Zoom and slow scrolling#
You can display a website as a Website tile or as a full slide via Full-screen website. In the settings, there are two aids for this, for example, for a dashboard on the office TV that needs to be readable from a few meters away.
Zoom#
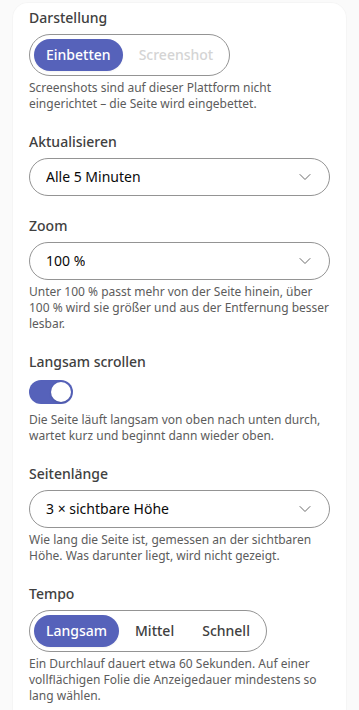
Values: 50, 75, 100, 125, 150, or 200 %.
Below 100%, more of the page fits in; above 100%, it becomes larger and more readable from a distance.
The zoom works in both displays, Embed and Screenshot.
Slow scroll#
With the Slow scroll switch, the page slowly scrolls from top to bottom, waits briefly, and then starts again from the top. This is only available on displays, not on the personal homepage.
Page length: how long the page is, measured by the visible height: 2, 3, 5, or 8 × visible height. What is below that is not shown.
Speed: Slow, Medium, or Fast. Below it, it says how long a cycle approximately takes.
Tip
On a full-screen slide, set the display duration to at least as long as one cycle. Otherwise, the slide changes before the end of the page is visible.
Some pages adapt to the window height and are simply stretched when scrolling. In this case, a smaller zoom helps more than scrolling.
Symbols in the slide bar#
When you open a playlist in the studio, the slide bar shows small icons on each slide. This way, you can see at a glance what a slide is and whether it is currently running on the displays. If you hover over an icon with the mouse, the explanation appears.
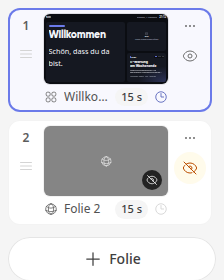
Slide type: what the slide shows: "Tile Layout", "Website (Full Screen)", "Image (Full Screen)", "Video (Full Screen)", or "YouTube Video (Full Screen)".
Eye: "Visible on displays – click to hide".
Crossed-out eye (orange): "Hidden – displays skip this slide". A click shows it again. The slide remains in the playlist.
Clock (colored): The slide has a schedule and is currently running, e.g., "Schedule: Mon–Fri, 08:00–17:00".
Clock (gray): The slide has a schedule but is not currently running, e.g., "Not running now – Schedule: Sat–Sun".
A slide without a schedule has no clock. Whether a slide is currently running is determined by the studio based on your computer's time and checks it every minute.
Playlists at specific times#
A display can show a different playlist at specific times: the canteen menu at lunchtime, something else on the weekend. You set this up on the display itself: Administration → Kibi Devices, Displays tab, open display, Playlist section.
The Default Playlist always runs when no schedule applies.
Use Other Playlist at Specific Times to add a row: Playlist, Days of the Week, From, and To.
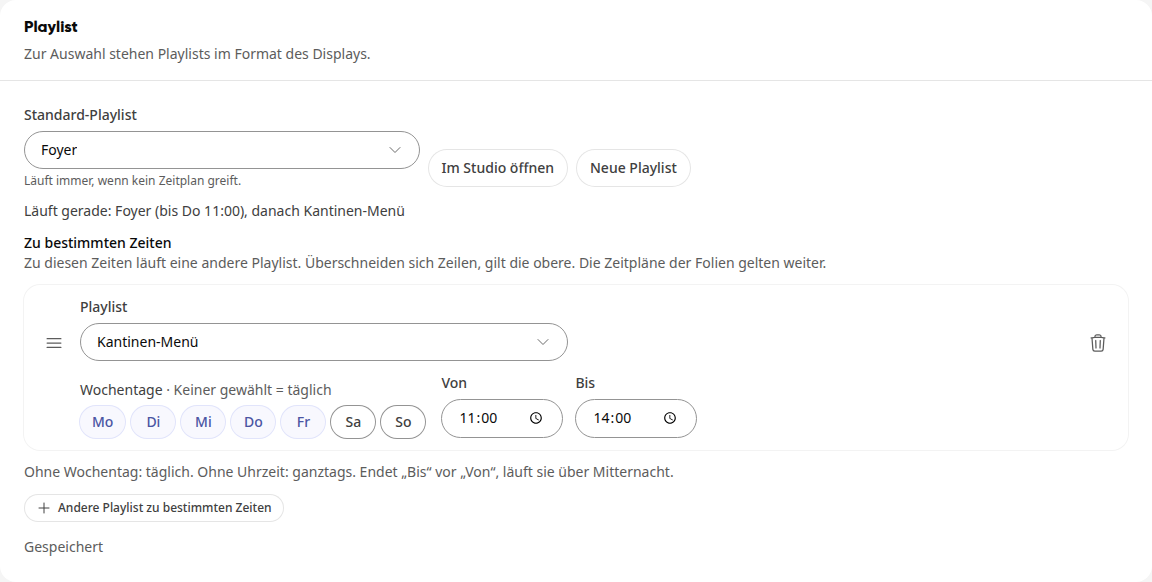
Add more rows in the same way. Change the order by dragging.
The settings save automatically. The display switches afterward by itself.
Rules#
If rows overlap, the top one applies. There are no priorities, only the order.
Without a day of the week: daily.
Without a time: all day.
If "To" ends before "From", e.g., 10:00 PM–6:00 AM, the playlist runs overnight.
If no row applies, the Default Playlist runs.
The schedules of the slides still apply: Within the running playlist, the display only shows the slides whose own schedule currently matches.
Only playlists in the display's format are available for selection. If you change the display's format, the rows under "At Specific Times" are removed.
Example#
Row 1: Canteen Menu, Mon–Fri, 11:00 AM–2:00 PM
Row 2: Weekend, Sat and Sun, all day
Default Playlist: Foyer, runs otherwise
On Monday at 12:00 PM, the Canteen Menu runs; on Saturday, "Weekend" runs all day; at all other times, "Foyer" runs.
On the display's page and next to the live preview, you see what is currently running and what comes next, e.g., "Running now: Canteen Menu (until 2:00 PM), then Foyer".
Info
The display switches on its own at the full minute, even if the internet connection is briefly down. Without rows under "At Specific Times", everything runs as before.
Display in operation#
On a display's page, you see the live preview and, under Status, whether it is reporting and what it is currently showing.
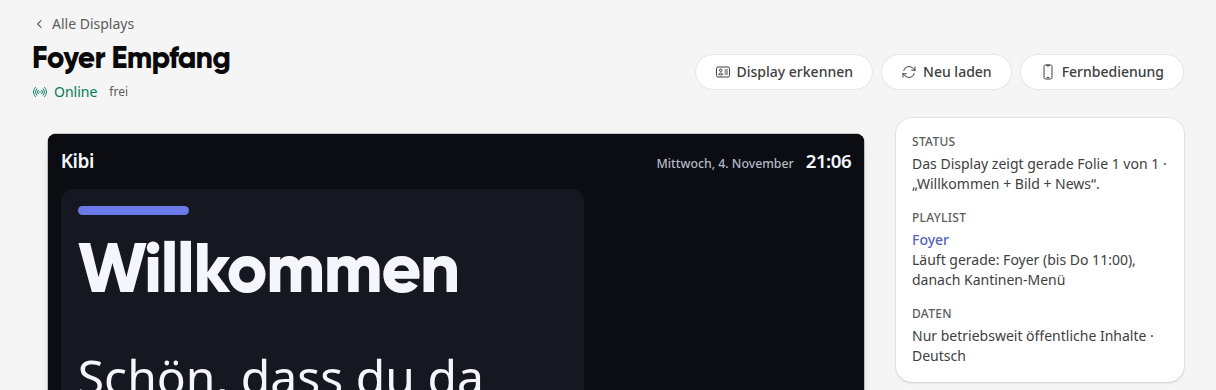
Identify Display: The display shows its name large for 15 seconds.
Reload: The display reloads the view.
Remote Control: Control the display from your smartphone.
Mode: Display plays the playlist; Terminal allows employees to briefly log in and book. The display then moves to the Terminals tab. The playlist remains assigned but does not run.
Settings: Name, location, format, language, groups, behavior outside the schedule, and touch control.
Disconnect: The device shows a code again. The previous display remains in the list with the status "Connection disconnected" until you remove it via Delete Display. If you reconnect the device, a new entry is created for it.
Logo on the display#
Displays have a dark background. Which logo appears is set under Administration → Appearance in the Brand tab:
Logo for dark color scheme uploaded: The display shows this logo as is, without a white background behind it.
Only normal logo uploaded: The display shows it on a light background so that it remains readable on the dark background.
No logo uploaded: The display shows the name.
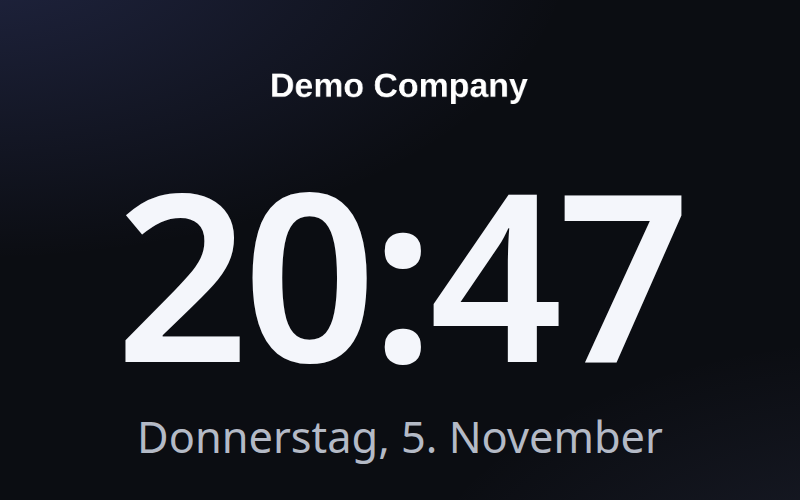
A changed logo appears as soon as the display reloads, at the latest overnight.